


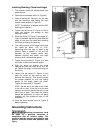
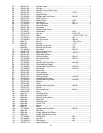


16
Operation
General operating procedure:
1. Position workpiece on table and secure with
clamp.
2. Set depth stop.
3. For lateral cuts, adjust positive stops
according to length of cut.
4. Position head front-to-back and laterally for
the first cut. If making a lateral cut, make
sure the Y-axis locking handle is tightened.
5. Turn on the machine and feed the chisel
and bit steadily into the workpiece.
IMPORTANT: The rate of feed must be fast
enough to prevent burning at the tip of the bit,
but not so fast as to cause the machine to slow
or stall. The different rates of feed for different
woods must be learned by experience.
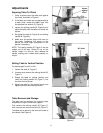
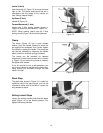
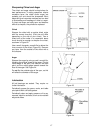
6. After the first cut, the head is moved using
one of the handles for each successive cut.
The direction of movement must allow the
chips to clear freely. Move the workpiece so
that the slot in the chisel is releasing chips
into the already-cut part of the workpiece
(Figure 21).
Do not have the chisel slot
against the blind end of the mortise, as the
chips will not be able to clear the chisel. This
can cause overheating and possible
breakage of chisel or bit.
When cutting deep mortises, make the cut in
several stages of approximately 1” each, to
allow chips to clear. When cutting through-
mortises, to prevent breakout at the back of the
workpiece and damage to the work table, use a
piece of scrap material under the workpiece as
support.
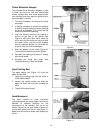
Maintenance
Before doing maintenance
on the mortiser, disconnect it from the
electrical supply by pulling out the plug or
switching off the main switch. Failure to
comply may cause serious injury.
The Mortiser requires only minor maintenance,
such as cleaning and lubrication and routine
adjustment and sharpening of the chisel and bit.
Wipe down the Mortiser after each use and, as
necessary, use light applications of oil or grease
to lubricate linkages, moving parts, etc.
If the power cord is worn, cut, or damaged in
any way, have it replaced immediately.
Figure 21