


9
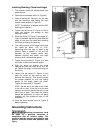
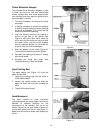
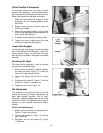
Installing Bushing, Chisel and Auger
1. The mortiser should be disconnected from
power source.
2. Open the chuck access cover (A, Figure 3).
3. Insert a bushing (B, Figure 3) into the hole
with the bushing’s hole facing the front
toward the set screw (C, Figure 3).
NOTE: The Mortiser is shipped with the 5/8”
bushing pre-installed.)
4. Tighten the set screw (C, Figure 3) with a
4
mm hex wrench just enough to hold
bushing in place.
5. Place the chisel (D, Figure 3) and auger (E,
Figure 3) beneath the bushing and allow the
auger to rest upon the table while pushing
the chisel up through the bushing.
6. The cutting portion of the auger must clear
the chisel by about 1/16” to 3/16”,
depending upon the type of wood to be
worked. Place a “spacer” of 1/8” to 3/16”
diameter (a hex wrench works well)
between bushing and chisel, and push
chisel up until it contacts the spacer.
7. Tighten the set screw (C, Figure 3) to hold
the chisel in place, and remove spacer.
8. Push the auger up through the chisel
opening and into the chuck as far as it will
go. Tighten the auger in the chuck using the
chuck key.
9. Loosen the set screw (C, Figure 3) and
push the chisel all the way up until it
contacts the bushing. This should provide
the proper distance so that the cutting
portion of the auger clears the chisel.
Tighten the set screw (C, Figure 3).
NOTE: Set the slot in the side of the chisel
to the left or right, if the cut is to be done
laterally; and front or back if the cut is to be
done front to back. The chisel slot should
always be positioned so chips are being
released into the already-cut part of the
workpiece.
10. Close the chuck access cover (A, Figure 3)
before operating.
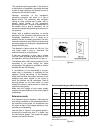
Grounding Instructions
Electrical connections must
be made by a qualified electrician in
compliance with all relevant codes. This
machine must be properly grounded to help
prevent electrical shock and possible fatal
injury.
Figure 3