


It is recommended that an approved ANSI full-face shield, that is impact
resistant, be worn during all drill press operations. Should the full-face
shield not be available, approved ANSI safety glasses with impact resistant
lenses and side shields MUST be used as a substitute. DO NOT use normal
glasses. If prescription glasses are necessary, wear ANSI approved goggles
that will cover the glasses and protect the eyes on all sides. Safety glasses
do not offer the overall protection around the eyes needed. Both the full-face
shield and safety goggles must meet ANSI Z87.1 specifications. Failure to
observe this WARNING could result in severe injury to the eyes or even
blindness.
Never attempt to brush wood dust or metal shavings away from the work-
piece while the drill press is in operation. ALL clean up should be done after
the machine has been turned off.
Non-slip footwear or safety shoes are recommended when operating the drill
press. Wood dust and metal shavings can be slippery and often cause falls
or other injuries when working with power tools.
The motor on this drill press is rated at 1750 RPM and is pre-wired for oper-
ation on 115/125 VAC, 60 Hz. This motor MUST NEVER be converted to 230
VAC. DO NOT install a motor that is convertible from 115/125 VAC to 230 VAC
on this drill press.
DO NOT attempt to perform any drilling operations until the worktable is
securely locked in position with the table lock clamp. Failure to lock the
worktable could cause it to unexpectedly tilt causing the workpiece to bind
on the drill bit. This could cause severe damage to the drill press and severe
injury to operator from pieces of drill bit flying from the broken drill.
Turn the drill press power switch to “OFF” and disconnect the tool from the
AC power source before making any adjustments to the drive belts. This step
is to eliminate any accidental starting of the motor.
TIP FOR USING THE DRILL PRESS
If the drill press is floor mounted in a permanent location, the AC power could be
routed through an approved electrical box that utilizes a throw-switch handle rather
than plugging/unplugging the power from the AC receptacle. This electrical box
should be installed by a certified electrician or electrical contractor and installed
to all current electrical codes for your specific location.
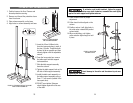
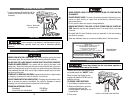
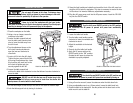
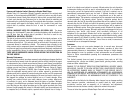
USING THE LASER LIGHT:
1. Place the workpiece on the table.
2. Turn the laser switch to the ON position.
3. Lower the drill bit to meet the work-
piece. The two laser lines should cross
where the drill meets the workpiece.
4. If the drill needs to be adjusted:
• Using a 3mm hex key, turn the laser
adjustment set keys counter-clockwise.
• Rotate the laser light housing until
the two laser lines intersect where
the drill meets the workpiece. DO
NOT stare directly at the laser lines.
5. Re-tighten the adjustment set screws.
OPERATING THE DRILL PRESS
The drill press is extremely top-heavy. For this reason, it is recommended
that the drill press be mounted to the work shop floor. The drill press MUST
be mounted on a level floor. Use shims to adjust the mounting to ensure it is
level. The drill press should also be mounted so that there is adequate clear-
ance completely around it. Failure to follow this WARNING could result in
damage to the drill press, severe injury, or even death to the operator.
To avoid being caught by the spinning tools, NEVER wear loose clothing, a
necktie, or jewelry while operating the drill press. ALWAYS tie back long hair
to ensure the spinning tool doesn’t catch it. NEVER wear gloves if the work-
piece is too short to stopped by the column in the event it should come unse-
cured during drilling operations.
When drilling materials that produce dust, an appropriate dust mask or res-
pirator should be worn.
23
FIGURE 17. ADJUSTING THE LASER LIGHT