


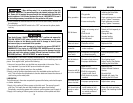


TROUBLE PROBABLE CAUSE SOLUTION
When drilling metal, it is a good practice to keep the
workpiece lubricated. This prevents galling and eventual seizing of the drill
bit. Some drill bit models have accessories that automatically lubricate the
metal workpiece. Call Alltrade Customer Service at 1-800-590-3723 to see if
a lubricating accessory is available for this particular drill press.
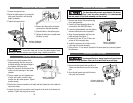
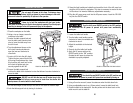
6. Slowly reverse the feed handles until the drill bit has been cleanly removed from
the workpiece.
7. Turn the drill press ON/OFF switch to the “OFF” and remove the yellow plastic
lock key.
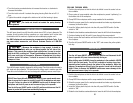
MAINTENANCE AND CLEANING
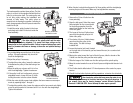
Turn the drill press “ON/OFF” switch to the “OFF” position and remove the
YELLOW SECURITY KEY before attempting any maintenance on this tool.
Failure to adhere to this Warning could result in damage to the drill press
and severe injury or even death to the operator.
Should the AC power cord become cut or frayed in any manner REPLACE IT
IMMEDIATELY. Any fraying is a POTENTIAL FIRE HAZARD as well as source
for severe electrical shock. Should the AC power cord be damaged near the
motor and need to be replaced, contact Alltrade Customer Service at 1-800-
423-3598 (toll free). DO NOT ATTEMPT to rewire the motor.
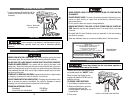
Your KAWASAKI™ Drill Press is virtually maintenance free. The drill press should be
cleaned after every usage preventing unwanted debris from interfering new work
pieces. On a regular basis, perform the following:
1. Use an air hose and blow any dust that may accumulate in the motor. This is
very important if you use the drill press on metal work pieces.
2. Brush all dust and debris away from the worktable.
3. Apply a coat of furniture-type paste wax to the worktable surface and the col-
umn. This will allow the components to function better and lessen the chance of
rust forming on the metal parts.
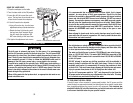
LUBRICATION
The ball bearings in the motor are packed in grease at the factory and should require
no further lubrication.
1. Apply a thin coating of lithium grease on the table rack. The aerosol type will
work fine. This keeps the rack and the table-crank gears from binding.
Periodically, remove the grease with a solvent, such as acetone, and re-apply it.
2. Apply a thin coating of lithium grease to the surfaces of the spindle and arbor.
Noisy operation
1. Incorrect belt tension
2. Dry spindle
3. Loose spindle pulley
4. Loose motor pulley
1. Adjust Tension. See Section
Installing the Drive Belts.
2. Lubricate Spindle.
3. Check retaining nut on center
pulley. Tighten if necessary.
4. Check setscrews on motor
pulley. Tighten if necessary.
Drill bit burns
1. Incorrect speed
2. Chips not coming out of
hole
3. Drill bit dull
4. Feeding too slow
5. Not lubricated
1. Change speed.
2. Retract drill bit frequently to
clear chips.
3. Change drill bits.
4. Increase feeding.
5. Lubricate drill bit.
Drill bit leads -
holes not round
1. Hard grain in wood
2. Defective drill bit
1. Replace drill bit.
2. Replace drill bit.
Wood splinters on
underside
1. No “back-up” material
under workpiece
1. Clamp workpiece under work-
piece.
Workpiece is torn
from hands
1. Workpiece not supported
or clamped properly
1. Clamp workpiece to work
table.
Drill bit binds in
workpiece
1. Workpiece pinching drill bit
2. Excessive feed pressure
3. Improper belt tension
1. Clamp workpiece.
2. Slow feeding speed.
3. Adjust Tension. See Section
Installing the Drive Belts.
Excessive drill bit
run-out or wobble
1. Bent drill bit
2. Worn spindle bearings
3. Drill bit not properly
locked in drill chuck
4. Drill chuck not properly
installed
1. Replace drill bit.
2. Contact Alltrade Customer
Service.
3. Re-set drill bit.
4. Reinstall drill chuck. See
Installing the Drill Chuck.
Quill returns too
slow or too fast
1. Improper spring tension 1. Adjust return spring.
Drill chuck fails to
remain on arbor
spindle.
1. Dirt, grease, or oil on
inside surface of drill
chuck mounting hole or
on outside surface of
arbor spindle
1. Clean drill chuck and arbor
spindle. See Installing the Drill
Chuck.
31