


17
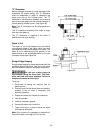
Changing Cutter Speed
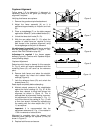
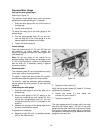
Referring to Figure 18:
The Model PM2700 Shaper is equipped with
pulleys that allow you to change the spindle speed.
The belt (B) placed on the upper pulleys (as shown
in Figure 16) provides 7,500 RPM spindle speed.
Placing the belt on the lower pulleys provides
10,000 RPM spindle speed.
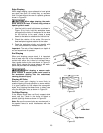
To change speed (refer to Figure 16):
1. Disconnect the machine from the power
source.
2. Open the door of the cabinet.
3. Remove the belt tension by moving the belt
tension handle (A) to the unlock (left) position.
This allows the motor (E) to swivel on its
mounting hinge.
4. Move the drive belt (B) to the other set of
grooves (C).
5. Lock the belt tension handle (A), securing the
motor (E) and placing tension on the drive
belt (C).
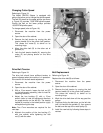
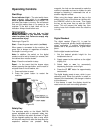
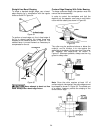
Drive Belt Tension
Referring to Figure 18:
The drive belt should have sufficient tension to
prevent slippage when the machine is in operation.
If the tension on the belt needs adjustment:
1. Disconnect the machine from the power
source.
2. Open the door of the cabinet.
3. With a 17mm wrench, loosen the lock nut (G)
on the belt tension assembly (refer to inset for
loosening direction).
4. Adjust the hex bushing (F) with a 17mm
wrench (refer to inset for adjustment direction)
for proper tension on the belt (B). The tension
handle (A) must be in the locked position (right)
while performing this step.
Note: Two 17mm wrenches are required for the
next step.
5. Maintain the position of the hex bushing (F)
with one wrench while tightening the lock
nut (G) with the other.
Figure 18
Belt Replacement
Referring to Figure 18:
Replace the drive belt (B) as follows:
1. Disconnect the machine from the power
source.
2. Open the door of the cabinet.
3. Remove the belt tension by moving the belt
tension handle (A) to the unlock (left) position.
This allows the motor (E) to swivel on its
mounting hinge.
4. Work the drive belt down all the way past the
pulleys.
5. Continue sliding the belt down on the left side
until it is free from the spindle (C), then remove
the belt over the top of the motor pulley (D).
6. Install the new belt by following these steps in
reverse.