


23
Safety Instructions for Basic Saw Operations
Before Each Use
Inspect your saw.
Disconnect The Miter Saw. To
reduce the risk of injury from acciden-
tal starting, unplug the saw, before
changing the setup, changing the
blade or adjusting anything.
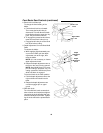
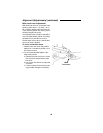
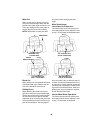
Compare the direction of rotation
arrow on the guard to the direction
arrow on the blade. The blade teeth
should always point downward at the
front of the saw.
Tighten the arbor screw.
Tighten the cover plate stop screw.
Check Damaged Parts. Check for:
• Proper alignment of moving parts,
• Damaged electric cords,
• Binding of moving parts,
• Broken parts,
• Stable mounting
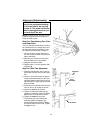
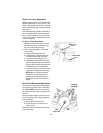
• Function of arm return spring and
lower guard: Push the arm all the
way down, then let it rise up until it
stops by itself. Check the lower
guard to see if it closed fully. If it did
not, follow the instructions in the
“Troubleshooting” section.
• Smooth, solid movement of sliding
assembly.
• Other conditions that may affect the
way the miter saw works.
If any part of this miter saw if missing,
bent, or broken in any way, or any
electrical parts don’t work, turn the
saw off and unplug it. Replace dam-
aged, missing, or failed parts before
using the saw again.
Keep Guards In Place, in working
order, and in proper adjustment.
Maintain Tools With Care. Keep the
miter saw clean for best and safest
performance. Follow instructions for
lubricating. DON’T put lubricants on
the blade while it’s spinning.
Remove Adjusting Keys And
Wrenches from tool before turning it
on.
To Reduce the Risk of Injury From Jams, Slips Or Thrown Pieces
• Use Only Recommended Accesso-
ries. (See “Accessory” section
within.) Consult this Owner’s man-
ual for recommended accessories.
Follow the instructions that come
with the accessories. The use of
improper accessories may cause
risk of injury to persons.
• Choose the right 12-inch diameter
blade for the saw and material you
plan to cut.
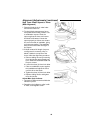
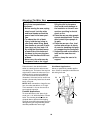
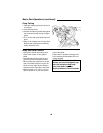
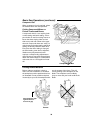
• Make sure the blade is sharp,
undamaged and properly aligned.
With the saw unplugged, push the
power head all the way down. Hand
spin the blade and check for clear-
ance. Tilt the power-head to 45
degree bevel and repeat the check.
If the blade hits anything, make the
adjustments shown in the Maintain-
ing “Alignment (Adjustments)” sec-
tion.
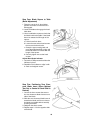
• Make sure the blade, arbor collars
and laser system are clean.
• Make sure the arbor collars' and
laser discs’ recessed sides are fac-
ing the blade.
• Using 1/4” hex end of combination
wrench (supplied) or 1/2-inch box
end wrench, make sure the left hand
thread arbor screw is firmly tight-
ened counterclockwise.
• Make sure all clamps and locks are
tight and there is no excessive play
in any parts.