


5
If any part of this miter saw is missing,
bent, or broken in any way, or any
electrical parts don't work, turn the
saw off and unplug it. Replace dam-
aged, missing, or failed parts before
using the saw again.
Keep Guards In Place, in working
order, and in proper adjustment.
Maintain Tools With Care. Keep the
miter saw clean for best and safest
performance. Follow instructions for
lubricating. DON’T put lubricants on
the blade while it’s spinning.
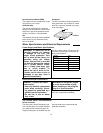
Remove Adjusting Keys And
Wrenches from tool before turning it
on.
To Reduce the Risk of Injury From Jams, Slips Or Thrown Pieces
• Use Only Recommended Acces-
sories. (See “Accessory” section
within.) Consult this owner’s manual
for recommended accessories. Fol-
low the instructions that come with
the accessories. The use of
improper accessories may cause
risk of injury to persons.
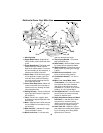
• Choose the right 12-inch diameter
blade for the saw and the material
you plan to cut.
• Make sure the blade is sharp,
undamaged and properly aligned.
With the saw unplugged, push the
power head all the way down. Hand
spin the blade and check for clear-
ance. Tilt the power head to 45
degrees left and right bevel and
repeat the check. If the blade hits
anything, make the adjustments
shown in “Alignment (Adjustments)”
section.
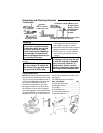
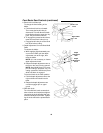
• Make sure the blade, arbor collars
and laser system are clean.
• Make sure the arbor collars' and
laser discs’ recessed sides are fac-
ing the blade.
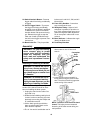
• Using the 1/4” hex end of combina-
tion wrench (supplied) or a 1/2-inch
box end wrench, make sure the left
hand thread arbor screw is firmly
tightened counterclockwise.
• Make sure all clamps and locks are
tight and there is no excessive play
in any parts.
• Keep Work Area Clean. Cluttered
areas and benches invite accidents.
Floor must not be slippery.
To reduce the risk of burns or other
fire damage, never use the saw near
flammable liquids, vapors or gases.
Plan Ahead To Protect Your Eyes, Hands, Face and Ears
Know Your Miter Saw. Read and
understand the owner’s manual and
labels affixed to the tool. Learn its
applications and limitations as well as
the specific potential hazards peculiar
to this tool.
To reduce the risk of injury from acci-
dental contact with moving parts,
don’t do layout, assembly, or setup
work on the miter saw while any parts
are moving.
To Reduce the Risk of Accidental
Starting. Make sure switch is “OFF”
before plugging miter saw into a
power outlet.
Plan your work.
Use The Right Tool. Don’t force tool
or attachment to do a job it was not
designed to do. Use a different tool
for any workpiece that can’t be held in
a solidly braced, fixed position.