


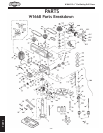
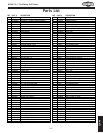

-26-
W1668 13
1
⁄4" Oscillating Drill Press
OPERATIONS
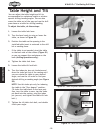
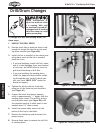
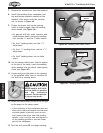
7. Remove the mandrel nut from the mandrel.
8. Install the sanding drum, sandpaper, and
top and bottom mandrel washers on the
mandrel, then secure with the mandrel
nut, as shown in Figure 46.
9. Choose the insert that has an opening
which is slightly bigger than the sanding
drum chosen (see Figure 46).
• For general drill bits, small reamers, and
miscellaneous small cutting and sanding
bits, use the
5
⁄8'' and the 1'' table inserts.
• For the 1'' sanding drum, use the 1
3
⁄8''
table insert.
• For the 1
1
⁄2'' sanding drum, use the 1
7
⁄8''
table insert.
• For the 2'' sanding drum, use no table
insert.
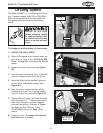
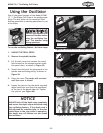
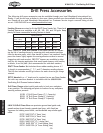
10. Set the chosen table insert into the pocket
in the top of the table, insert the sanding
drum mandrel into the chuck, then tighten
chuck (see Figure 47).
11. Loosen and pivot the table so the opening
in the installed table insert is centered to
the drill bit or sanding drum.
NEVER sand or drill with-
out the table in position
and the workpiece
secured. Serious person-
al injury may occur.
12. Adjust the table height to use all of the grit
on the paper as the paper wears.
• If the thickness of the workpiece does not
allow much table movement and the sand-
ing drum paper is partially worn on one
end, remove the drum from the sanding
spindle, turn it end for end and replace it
on the sanding spindle to use the newer
part of the sandpaper.
13. Turn the drill press ON, and begin sanding.
Figure 46. Sanding drum table insert.
Insert
Bottom Mandrel
Washer
Mandrel Nut
Figure 47. Sanding drum installed.
Top Mandrel
Washer
Insert