


-17-
N(/(*(/Fg\e<e[N`[\9\ckJXe[\i
J<KLG
('% Reset the emergency stop button, then turn the
sanding motor FE.
Efk\1K_\jXe[`e^dfkfidljkY\FE Y\]fi\k_\
Zfem\pfiZXeY\jkXik\[%
((% Turn the conveyor FE and verify that it operates
correctly—it should move from front-to-back. Use
the conveyor feed rate dial to vary the speed.
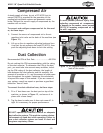
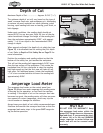
()% Turn the conveyor F==, then remove the switch dis-
abling key, as shown in =`^li\(,.
(*% Try to turn the conveyor FE.
— If the conveyor does not start, the switch disabling
feature is working as designed.
— If the conveyor does start, immediately stop the
machine and disconnect it from power. The switch
disabling feature is not working correctly. This
safety feature must work properly before proceed-
ing with the regular operations. Call Tech Support
for help.
(+% Press the emergency stop button to turn the sanding
motor F==, re-install the switch disabling key, then
reset the emergency stop button.
(,% Disconnect the compressed air source from the sand-
er and attempt to turn the sanding motor FE.
— If the machine does not start, the air pressure
safety switch is working correctly.
— If the machine does start (with the compressed air
source disconnected from the machine), immedi-
ately turn the machine F== and disconnect it from
power. The air pressure safety switch is not work-
ing correctly. This safety feature must work prop-
erly before proceeding with regular operations.
Call Tech Support for help.
(-% When all of the steps of the K\jkIleprocedure
have been successfully completed, your sander is
ready for operation.
=`^li\(,% Removing the switch disabling
key from the conveyor ON/OFF switch.
I\Zfdd\e[\[
8[aljkd\ekj
For your convenience, the adjustments
listed below have been performed at the
factory and no further setup is required to
operate your machine.
However, because of the many variables
involved with shipping, some of these
adjustments may need to be repeated to
ensure optimum results. Keep this in mind
as you start to use your new machine.
Step-by-step instructions for these adjust-
ments can be found in the J<IM@:<section
of this manual.
• Conveyor Belt Tensioning (GX^\)0) &
Tracking (GX^\*').
• Gib Adjustment (GX^\*().
• Sanding Drum & Conveyor Parallelism
(GX^\*)).
• Air Pressure Safety Switch (GX^\*+).
• Depth of Cut Safety Bar Height (GX^\
*,).
• Pressure Roller Adjustment (GX^\*-).