


-36-
N(/(*(/Fg\e<e[N`[\9\ckJXe[\i
J<IM@:<
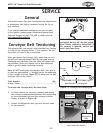
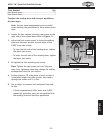
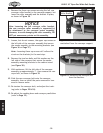
8[aljk`e^Gi\jjli\ Ifcc\ij
The height of the pressure rollers (see =`^li\*+) is set
slightly below the bottom of the sanding drum to keep the
workpiece firmly against the conveyor belt as it passes
through the sander, preventing workpiece kickback.
The pressure roller height was set by the factory at
approximately 0.063" (
1
⁄16") below the lowest point of the
sanding drum.
KffcjE\\[\[ Hkp
Hex Wrench 4mm ...............................................1
Feeler Gauge 0.063" (
1
⁄16") ....................................1
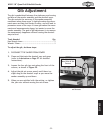
KfX[aljkk_\_\`^_kf]k_\gi\jjli\ifcc\ij#[fk_\j\
jk\gj1
(% Make sure the sanding drum and conveyor are paral-
lel (refer to GX^\*) for detailed instructions).
)% Surface plane and sand a 18" wide piece of stock
until it is flat and the same height from side-to-side.
*% DISCONNECT THE SANDER FROM POWER!
+% Open the sanding belt access door and remove the
sanding belt from the machine.
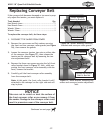
,% Loosen the eight adjustment cap screws securing the
front and rear pressure rollers (see =`^li\*,).
Note: K_\i\Xi\]fliX[aljkd\ekZXgjZi\njfek_\
]ifekXe[]flifek_\i\Xif]k_\jXe[`e^ZXY`e\k%
-% Place the workpiece from Jk\g) under the sanding
drum, then elevate the sander assembly so that the
sanding drum is 0.063" (
1
⁄16") above the workpiece.
.% Manually adjust the pressure rollers so that they are
lightly resting on the workpiece from side-to-side,
then retighten the cap screws to secure the pressure
rollers in place.
/% Re-install the sanding belt and secure the access
door.
=`^li\*+% Front and rear pressure rollers.
Pressure Rollers
=`^li\*,% Pressure roller adjustment cap
screws (front cap screws shown).
Cap Screws