


For Machines Mfg. Since 7/09 EVS Toolroom Lathes
-63-
MAINTENANCE
Changing Cutting Fluid
When you replace the old cutting fluid, take the
time to thoroughly clean out the chip drawer,
catch tray, and fluid tank. The entire job only
takes about a
1
⁄2 hour when you are prepared
with the proper materials and tools. Used
cutting fluid is hazardous! Follow all applicable
regulations for storage and disposal.
Items Needed: Qty
Safety Wear ......See Hazards section on Page 62
New Cutting Fluid .................................. 3 Gallons
Empty 5 Gallon Bucket w/Lid ..............................2
Phillips Screwdriver #2 ........................................1
Wrench
3
⁄4" .............................................................1
Disposable Shop Rags ................. Approximately 6
Hose or Tubing
5
⁄8" x 60" (optional) ............ 1 Piece
Magnets (optional) ................ As Many As Desired
To change the cutting fluid:
1. Position the coolant nozzle over the splash
guard, so it is pointing behind the lathe. If
you have the optional hose, connect it to the
end of the coolant nozzle now.
2. Place the 5-gallon bucket behind the lathe
and underneath the coolant nozzle. If you
have the optional hose, place the hose in the
bucket. Otherwise, you may need to hold the
bucket up to the coolant nozzle to prevent
coolant from splashing outside of the bucket.
3. Turn the cutting fluid pump ON (or have
another person turn it ON if you are holding
the bucket), and pump the old cutting
fluid out of the tank. Turn the pump OFF
immediately after fluid stops flowing.
Running the pump without adequate fluid in
the tank may permanently damage it. This is
abuse and not covered by the warranty.
Note: The electrical conduit was purposely left
long, so the tank can be removed without
disconnecting wires from the pump. Do not
disconnect electrical lines.
4. DISCONNECT LATHE FROM POWER!
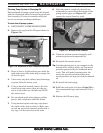
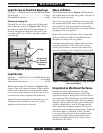
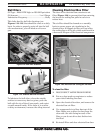
5. Remove the vented cover shown in Figure
122 and slide the tank half way out of the
base, as shown in Figure 123.
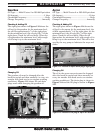
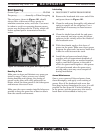
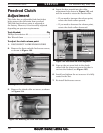
— If necessary, disconnect fluid hose from
pump, where shown in Figure 124.
6. Pour out the remaining cutting fluid into
your 5-gallon bucket and close the lid.
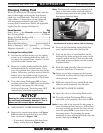
7. Wipe up the layer of swarf/residue on the
bottom of the tank and put the waste in the
second 5-gallon bucket. Flush out the tank
with soapy water and drain into the second
5-gallon bucket.
8. Slide the tank partially into the base and
reconnect fluid hose (if removed).
Tip: Leave one or more magnets at the bottom
of the tank to collect metal chips and make
cleanup easier next time.
9. Refill the tank with new cutting fluid, then
slide the tank completely into the base.
10. CONNECT LATHE TO POWER.
11. Open the valve on the cutting fluid nozzle.
12. Turn the cutting fluid pump ON to verify
that fluid cycles properly, then turn it OFF.
Note: It may take a few seconds for the pump to
start circulating fluid; however, if fluid does
not start coming out within the first minute,
turn the pump OFF so you do not burn out
the pump motor. Try priming the pump
manually by pour cutting fluid down into the
nozzle, then repeat Step 13.
Figure 124. Fluid hose that may need to be
disconnected in order to remove tank for cleaning.
Fluid Hose
Disconnect
Here if
Necessary