


of parts, mounting, and any other conditions that may affect its operation. Aguard or other part
that is damaged should be properly repaired or replaced.
• DIRECTION OF FEED. Feed work into a blade or cutter against the direction of rotation of the
blade or cutter only.
• NEVER LEAVE TOOLRUNNING UNATTENDED. TURN POWER OFF. Don’t leave tool until
it comes to a complete stop.
ADDITIONAL SAFETY RULES FOR TABLE SAWS
• Wear eye protection.
• Use saw-blade guard and spreader for every operation for which it can be used, including
all through sawing.
• Keep hands out of line of saw blade.
• Use a push-stick when required.
• Know how to reduce risk of kickback.
• Do not perform any operation freehand.
• Never reach in back of or over saw blade.
• USE A DUST MASK and safety glasses when sawing. This saw is capable of generating
large amounts of sawdust.
• Do not use lubricants or cleaners (particularly spray or aerosol) in the vicinity of the plastic
guard. The polycarbonate material used in the guard is subject to attack by certain chemi-
cals.
WARNING: Some dust created by power sanding, sawing, grinding, drilling, and other con-
struction activities contains chemicals known to cause cancer, birth defects or other reproduc-
tive harm. Some examples of these chemicals are:
• lead from lead-based paints,
• crystalline silica from bricks and cement and other masonry products, and
• arsenic and chromium from chemically-treated lumber (CCA).
Your risk from these exposures varies, depending on how often you do this type of work. To
reduce your exposure to these chemicals: work in a well ventilated area, and work with
approved safety equipment, such as those dust masks that are specially designed to filter out
microscopic particles.
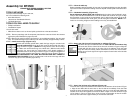
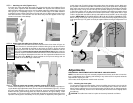
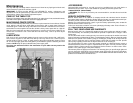
SAW BLADE GUARD AND SPREADER
Your table saw is equipped with a blade guard and spreader assembly (Figure A part A and
Figure 22 part C) that covers the blade and prevents accidental contact. The spreader is a
flat plate that fits into the cut made by the saw blade and effectively fights kickback by less-
ening the tendency of the blade to bind in the cut. The spreader can only be used when mak-
ing through cuts that sever the wood. When making dadoes, rabbits and other cuts that make
less than through cuts, the blade guard and spreader assembly must be removed from the
saw.
NOTE: Be sure to re-install guard and spreader after these cuts.
Two anti-kickback pawls are located on the sides of the spreader that allow the wood to pass
through the blade in the cutting direction but lock it if it tries to move backwards toward the
operator.
TERMS:
The following terms will be used throughout the manual and you should become famil-
iar with them.
• Through-Sawing refers to any cut that completely severs the workpiece.
• Push-Stick refers to a wooden stick, usually home-made, that is used to push small workpieces
through the saw and keeps the operator’s hands clear of the blade.
• Kickback occurs when the saw blade binds in the cut and violently thrusts the workpiece back
toward the operator.
• Freehand refers to cutting without the use of a miter gauge or rip fence or any other means of
guiding or holding the workpiece other than the operator’s hand.
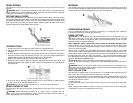
KICKBACKS - HOW TO AVOID THEM AND PROTECT
YOURSELF FROM POSSIBLE INJURY:
Kickback is a dangerous condition! It is caused by the workpiece binding against the blade.
The result is that the workpiece can move rapidly in a direction opposite to the feed direction.
During kickback, the workpiece could be thrown back at the operator. It can also drag the
operator’s hand back into the blade if the operator’s hand is in the wrong place.
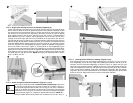
1.)Always use the guard and make certain it is in good working order. The guard’s splitter
helps prevent binding and the anti-kickback pawls on each side of the splitter minimize the
possibility of kickback. Use extra caution until the workpiece is through the splitter and has
engaged anti-kickback pawls.
2.)Do not saw warped, bowed or cupped wood. The workpiece must have one straight,
smooth side to go against the rip fence or miter gauge. The workpiece must sit flat on the
table without rocking.
3.)Do not cut “freehand”. Always use either the rip fence or the miter gauge. Never use both.
4.)Use extra care when the guard assembly cannot be used (during dadoing or molding).
5.)Support large workpieces carefully. Allowing them to sag or droop can cause kickback.
6.)Be certain that the rip fence is parallel to the saw blade.
7.)Do not rip by applying the feed force to the section of the workpiece that will become the
cut-off (free) piece. Feed force when ripping should always be applied between the saw
blade and the fence; use a push stick for short work, 6” (152mm) wide or less. For less
than 2" (51mm) wide, you must use a special fixture.
8.)Keep saw blade guard, splitter and anti-kickback pawls in place and operating properly.
Keep pawls sharp. If pawls are not operational, return your unit to the nearest Black &
Decker Service Center for repair. The splitter must be in alignment with the saw blade and
the pawls must stop a kickback once it has started. Check their action before ripping.
9.)Plastic and composition (like hardboard) materials may be cut on your saw. However,
since these are usually quite hard and slippery, the anti-kickback pawls may not stop a
kickback. Therefore, be especially attentive to following proper set up and cutting proce-
dures for ripping.
10.) Use saw blade guard and spreader for every operation for which it can be used, includ-
ing all through sawing.
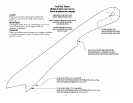
MAKING A PUSH STICK (BACK PAGE)
• In order to operate your table saw safely you must use a push-stick whenever the size or
shape of the workpiece would cause your hands to be within 6 inches of the saw blade or
other cutter.
• No special wood is needed to make a push-stick as long as it’s sturdy and long enough. A
length of 12 inches is recommended with a notch that fits against the edge of the work-
piece to prevent slipping. It’s a good idea to have several push sticks of the same length
(12 inches) with different size notches for different workpiece thicknesses.
• See the inside back cover for a picture of a push stick. The shape can vary to suit your
own needs as long as it performs its intended function of keeping your hands away from
the blade.
SAVE THESE INSTRUCTIONS FOR FUTURE USE
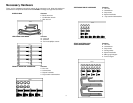
SPECIFICATIONS
Table Size 23 1/2" x 40 1/2"
Miter Angle 60° L&R
Bevel Angle 2° Right to 47° Left
Blade Size 10" (254mm)
Max. Cut Depth 0° Bevel ..............3-3/8" (79mm)
Max. Cut Depth 45° Bevel ............2-1/4" (54mm)
RPM, no load 4800
4