


26.
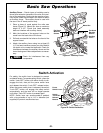
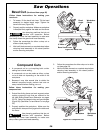
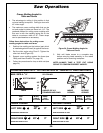
Bevel Cut (Continued from page 25)
Follow these instructions for making your
bevel cut:
1. To loosen, lift the bevel lock lever. Tilt the head
assembly to desired bevel angle. Tighten the
bevel lock lever (Figure 29).
2. Properly position workpiece. Make sure workpiece
is clamped firmly against the table and the fence.
Use clamping positions that do not
interfere with operation. Before
switching on, lower the head assembly to make sure
the clamp clears the guard and head assembly.
3. Follow the procedures for either a chop cut or
slide cut (see page 24).
4.
Wait until blade comes to a complete stop before
r
eturning head assembly to the raised position
and/or removing workpiece.
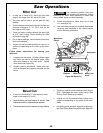
Figure 29. Bevel Cut
WARNING
!
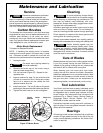
Saw Operations
Compound Cuts
• A compound cut is a cut requiring both a miter
setting and a bevel setting.
• A compound cut can be made as either a chop
cut or a slide cut depending on the width of the
workpiece.
• Because it may take several tries to obtain the
desir
ed compound angle, perform test cuts on
scrap material before making your cut.
Follow these instructions for making your
compound cut:
1. Extend the sliding fence and work supports when
making compound cuts that ar
e mitered to the
left (see Sliding Base/Fence Extension on pages
22-23). Select the desir
ed miter and bevel angles
(Figure 30). (See Miter Cut and Bevel Cut on page
25.)
2.
Pr
operly position the workpiece. Make sur
e the
workpiece is clamped firmly against the table and
the fence.
Use clamping positions that do not
interfere with operation. Before
switching on, lower head assembly to make sur
e
clamp clears guard and head assembly.
3. Follow the procedures for either chop cut or slide
cut (see page 24).
4. Wait until blade comes to a complete stop before
returning head assembly to the raised position
and/or removing workpiece.
Figur
e 30. Compound Cut
WARNING
!
W
orkpiece
Workpiece
Clamp
Bevel
Angle
0º Miter
W
orkpiece
Workpiece
Clamp
Bevel
Angle
Bevel Lock Lever