


English–3
1 619 929 565 • (03.05) T
3 OPERATING INSTRUCTIONS
Before Use
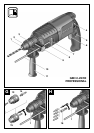
Auxiliary Handle (see Fig. )
Operate the machine only with the auxiliary han-
dle 11.
By rotating the auxiliary handle
11
to a comfortable po-
sition, a fatigue-free and therefore safe working posi-
tion can be achieved.
Loosen the auxiliary handle
11
by turning counter
clockwise and swing it to the desired position. Then
retighten the auxiliary handle
11
by turning in the
clockwise direction.
Selection of Tools
For hammer drilling and chiseling (only with the acces-
sory MV 200), SDS-plus tools are necessary that are in-
serted into the SDS drill chuck of the machine (see
SDS-Plus Tools
).
For drilling in steel or wood, driving screws and cutting
threads, tools without SDS-plus (e.g., drills with cylindri-
cal shafts) are used. For these tools, a special drill chuck
is required (see
Working with Tools without SDS-Plus
).
Take care when changing tools that the dust pro-
tection cap 2 is not damaged.
SDS-plus Tools
The SDS-plus tool is designed to be freely movable.
This causes eccentricity when the machine is not load-
ed. However, the drill automatically centers itself dur-
ing operation. This does not affect drilling precision.
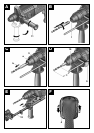
Inserting a SDS-Plus Tool (see Fig. )
Clean the tool before inserting and lightly grease the
insertion end.
Insert the tool with a twisting motion into the tool hold-
er
1
until it locks.
The tool locks itself. Check the locking by pulling on
the tool.
Removing SDS-Plus Tools (see Fig. )
Pull the locking sleeve
3
to the rear
(a)
, hold it in this
position and remove the tool from the tool holder
(b)
.
Setting the Drilling Depth (see Fig. )
With the depth stop
10
, the maximum drilling depth
t
can be set.
Press the button
9
of the auxiliary handle and insert the
depth stop into the auxiliary handle
11
so that the
grooved side of the depth stop points downward.
Insert the SDS-plus tool to the stop into the tool
holder
1
. Otherwise, the freedom of motion of the SDS
tool can lead to an incorrect setting of the drilling depth.
Pull out the depth stop so far that the distance be-
tween the drill tip and the tip of the depth stop corre-
sponds to the desired drilling depth
t
.
Dust Extraction with the
Vacuuming Attachment (Accessory)
For vacuuming dust, a dust extraction attachment (ac-
cessory) is required. While drilling, the dust extraction
attachment springs back so that the vacuuming head
is always held against the drilled surface.
Press the button
9
of the auxiliary handle and remove
the depth stop
10
. Press the button
9
again and insert
the dust extraction attachment from the front into the
auxiliary handle
11
(see Fig. ).
The maximum drilling depth
t
can also be set with the
dust extraction attachment mounted. For this pur-
pose, place the machine without switching on firmly
against the area to be drilled so that the drill rests on
the surface. Read the value from the scale of the dust
extraction attachment and add the desired drilling
depth
t
to this value.
Loosen the knurled screw on the depth stop of the
dust extraction attachment and slide the depth stop to
the calculated value. Then retighten the knurled screw
of the depth stop.
Connect a vacuum hose (19 mm Ø, accessory) to the
opening of the dust extraction attachment.
The vacuum cleaner (e.g., GAS ...) must be suitable
for the material to be worked.
When vacuuming dry dust that is especially detrimen-
tal to health or carcinogenic, use a special vacuum
cleaner.
Putting into Operation
Always use the correct supply voltage!
The voltage of the power source must agree with the
value given on the nameplate of the machine. Machines
designated for 230 V can also be operated with 220 V.
Set the Operating Mode
With the operating mode selector switch
7
, select the
operating mode of the machine.
Change the operating mode only when the ma-
chine is switched off!
Otherwise, the machine can
be damaged.
To change the operating mode, press the locking but-
ton
8
and turn the operating mode selector switch
7
to
the desired position until it can be heard to latch.
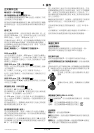
For hammer drilling in concrete or stone
and for chiseling.
For drilling in steel or wood, for driving
screws and cutting threads.
A
B
C
D
E