


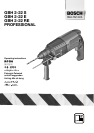


English–4
1 619 929 565 • (03.05) T
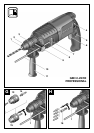
Setting the Direction of Rotation
(GBH 2-22 RE)
With the right/left rotation switch
4
, the rotational di-
rection of the machine can be changed (see Fig. ).
Right rotation: Turn the right/left rotation switch
4
on
both sides to position .
Left rotation: Turn the right/left rotation switch
4
on
both sides to position .
Switching On/Off
To
switch on
the machine, press the on/off switch
6
.
To
lock on
, press the on/off switch
6
and lock by
pressing the locking button
5
.
To
switch off
, release the on/off switch
6
. When
locked, first press the on/off switch
6
and then release.
Setting the Speed (GBH 2-22 E/GBH 2-22 RE)
By increasing or decreasing the pressure on the on/off
switch 6, the speed of the switched-on machine can
be continuously regulated.
Reduced speed of the machine facilitates the starting
of holes (e.g., on smooth surfaces such as tiles), pre-
vents the slipping of the drill and the splintering of the
drilled hole.
Recommended Speed Ranges:
– High speed for hammer drilling in concrete or stone
as well as for chiseling
– High speed for drilling in steel
– Medium speed for drilling in wood
– Low speed for driving screws and cutting threads.
Working Instructions
Chiseling
For chiseling, a SDS-plus chiseling attachment
MV 200 (accessory) is required that is placed on the
tool holder.
Working with Tools without SDS-Plus
Do not use tools without SDS-plus for hammer
drilling! Tools without SDS-plus and their holder
(e.g., drill chuck) would be damaged by hammer drill-
ing.
When working with tool without SDS-plus, set the op-
erating mode selector switch 7 to position .
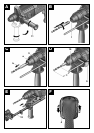
Drilling
To work with tools without SDS-plus (e.g., drills with
cylindrical shafts), a suitable drill chuck must be used.
Screw the SDS-plus adapter shaft 14 (accessory) into
a ring-gear or quick clamping drill chuck 13 (see Fig.
).
Clean the adapter shaft and lightly grease the insertion
end before inserting.
Insert the shaft of the assembled drill chuck 15 with a
twisting motion into the tool holder 1 until it can be
heard to lock (see Fig. ).
The adapter shaft locks itself. Check the locking by
pulling on the drill chuck.
To remove the drill chuck 15, pull the locking sleeve 3
to the rear, hold in this position and remove the drill
chuck from the tool holder.
Screw driving
To use screwdriver bits, a universal holder with SDS-
plus shaft 16 (accessory) is required.
Clean the adapter shaft and lightly grease the insertion
end before inserting.
Insert the universal holder 16 with a twisting motion
into the tool holder 1 until it locks (see Fig. ).
The universal holder locks itself. Check the locking by
pulling on the universal holder.
Insert a screwdriver bit into the universal holder.
To remove the universal holder 16, pull the locking
sleeve 3 to the rear, hold it in this position and remove
the universal holder from the tool holder.
4 MAINTENANCE AND SERVICE
Maintenance
Before any work on the machine itself, pull the power
plug.
For safe and efficient working, always keep the ma-
chine and the ventilation slots clean.
Clean the tool holder after each use.
Replacing the Dust Cap
Replace the dust protection cap 2 without delay if it is
damaged. A damaged dust protection cap can allow
dust to penetrate into the tool holder and lead to mal-
functions.
Have the replacement of the dust protection cap
performed by a customer service agent.
Should the tool fail in spite of careful manufacturing and
testing procedures, have the repairs performed by an
authorized customer service location for Bosch elec-
tro-tools.
For inquiries and spare parts ordering, please include
the 10-digit order number on the nameplate of the tool.
F
G
G
H