


For technical questions, please call 1-800-444-3353;
Troubleshooting section at end of manual.
Page 21SKU 95424, 95629
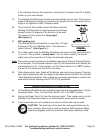
SETTING UP THE WELD
WARNING!
Before welding, make sure to read and understand all safety
precautions and warnings discussed on pages 4 through 10.
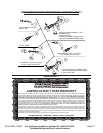
Power Switch (1C): Always make sure the Power Switch is in its “OFF” posi-
tion before plugging the Welder into a 230 volt, grounded, electrical outlet. (See
Figure J).
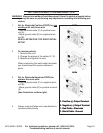
Overload Protector (2C): If too much current is drawn from the Welder, the Over-
load Protector will activate. The RED Overload Indicator Light will illuminate and
the Welder will automatically turn off until it cools down. If this happens, turn the
Power Switch (1C) to its “OFF” position and wait approximately 2 to 5 minutes.
(See Figure H.) When the RED Overload Indicator illuminates and the sound is
audible, the welding wire that was welded on the NOZZLE (1E) or the Wire Drive
Assembly (16A) has failed.
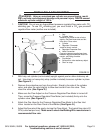
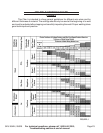
Wire Speed Control Knob (3C): The Scale surrounding the Knob is relative value,
not wire feed speed. Adjust the Wire Feed Speed Knob based on thickness of the
metal being welded. (See Figure L.)
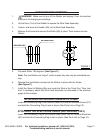
Voltage Selector Knob (5C):
WARNING!
DO NOT SWITCH THE VOLTAGE SELECTOR KNOB DURING THE WELDING!
WARNING!
BEFORE USING THE WELDER, SET THE VOLTAGE SELECTOR KNOB IN
THE 3-5 RANGE AND KEEP IN THAT SETTING FOR 10-15 MINUTES!
The Scale surrounding the Knob is relative value, not voltage. Adjust the Voltage
Selector Knob based on thickness of the metal being welded. (See Figure J.)
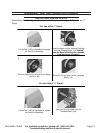
Securely clamp the Ground Clamp (22A) as close as possible to the metal object
to be welded, or to the metal workbench where the object is mounted and electri-
cally connected.
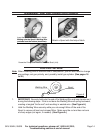
NOTE: The workpieces should be firmly held together and in position while welding.
Use clamps (not included) to hold the workpieces so you can concentrate on the
job at hand. The distance (if any) between the two workpieces must be controlled
properly to allow the weld to hold both sides securely while allowing the weld to
penetrate fully into the joint.
1.
2.
3.
4.
5.
6.