


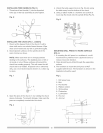
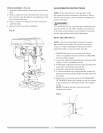
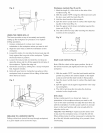

4_Slidethetableassemblywiththerackontothe
column.
5_Engagethebottomoftherack(5)withthelipofthe
columnsupport(6)_Tightenthetablebracketlock
handle(4)to lockthetableassemblytothecolumn.
Fig.D
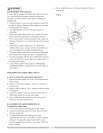
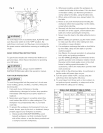
7_Instal!thetablecrankhandle(9)ontothewormgear
shaft(11) onthesideofthetablesupport(12)_
8_Lineuptheflatsideoftheshaftwiththesetscrew(10)
inthecrankhandleandtightenthescrewwiththe
3mmhexwrenchprovided.
Fig.F
5
j6
J
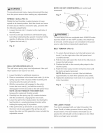
6_ install the rack ring (7) on the column so the top lip of
the rack sits into the rack ring.
IMPORTANT: The bottom of the collar MUST NOT be
pushed all the way down onto the top of the rack. MAKE
SURE the top of the rack is under the bottom of the
collar and that there is enough clearance to al!ow the
rack to freely rotate around the column. Tighten the set
screw (8).
NOTE: To avoid column or collar damage, DO NOT
OVERTIGHTEN the set screw.
Fig. E
®
©
11
12
10
9
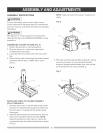
INSTALLING THE HEAD (FIG. G}
IAWARNINGI
The Drill Press head is heavy and should be lifted with
the help of two PEOPLE OR MORE to safely assemble
the drill press head on the column.
1. Carefully lift the head (1) and slide it into the
column (2). Make sure the head slides down over the
column as far as possible. Align the head with the
base.
2. Using the 4ram hex wrench provided, tighten the two
head locking setscrews (3) on the right side of the
head.
Fig. G
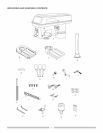
8
7
5
11