


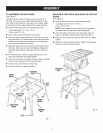

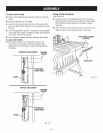
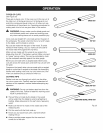
Toinstall anti=kickback pawls:
[] Press and hold the button on the right side of the anti-
kickback pawls.
[] Align the slot in the pawls over the rear hole in the
spreader/riving knife.
[] Push the pawl handle down snapping them into place
and release the button.
NOTE: Pull on the pawl handle to make sure pawls are
securely locked.
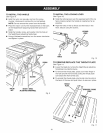
NOTE: Blade alignment with the spreader can be adjusted
for different blade widths. Refer to: To Check and Align
the Spreader/Riving Knife and Saw Blade. Check the
blade guard assembly for clearances and free movement.
PAWL
HANDLE BUTTON
ANTI=KICKBACK
Fig. 15
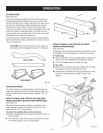
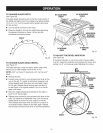
CORRECT
INCORRECT
Fig. 16
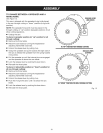
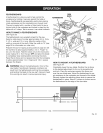
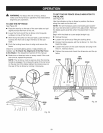
TO CHECK AND ALIGN THE SPREADER/RIVING
KNIFE AND SAW BLADE
See Figures 17- 18.
To check alignment of the spreader/riving knife:
[] Unplug the saw.
[] Raise the saw blade by turning the height/bevel
adjusting handwheel clockwise.
[] Remove the anti-kickback pawls and blade guard
assembly. Place a framing square or straight edge
against both the saw blade and the spreader.
NOTE: Place framing square between carbide teeth
and measure from blade. This step will insure framing
square is square against blade from the front to back
of blade.
[] The saw blade and spreader/riving knife are aligned
when the framing square contacts both the blade and
spreader/riving knife evenly with no gaps.
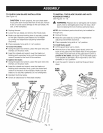
if the spreader/riving knife is out of alignment with the saw
blade, adjustment is needed. The spreader/riving knife
must be in alignment front to back (horizontally) and top to
bottom (vertically).
HEX
KEY
SPREADER/
RIVINGKNIFE
FRAMING
SCIUARE
Fig. 17
21