


15
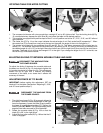
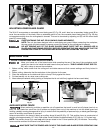
Fig. 35
B
C
D
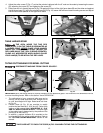
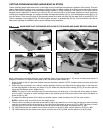
Fig. 36
C
D
A
B
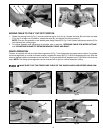
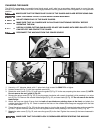
ADJUSTING LOWER BLADE GUARD
The 36-412 incorporates an moveable lower blade guard (C) Fig. 36, and it also has a secondary blade guard (B) to
cover the rear section of the blade. After an extended period of use, the moveable lower blade guard (C) Fig. 36 may
not operate smoothly when the cuttinghead is lowered. This can be corrected by adjusting nut (D) until the lower blade
guard (C) moves freely.
OVERTIGHTENING THE NUT COULD IMPAIR GUARD MOVEMENT.
NOTE: This unit has been designed with an articulating rear guard. Before contacting the workpiece,
the rear guard will rotate upward to expose more of the blade as the cuttinghead is lowered.
DO NOT REMOVE ANY OF THE BLADE GUARDS. MAKE SURE THAT ALL GUARDS ARE IN
PLACE AND FUNCTIONING PROPERLY BEFORE OPERATING THE SAW. MAKE SURE THAT THE
FENCES ARE CLEAR OF THE GUARD AND BLADE BEFORE OPERATING THE SAW.
B
A
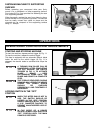
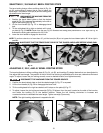
Fig. 37
TYPICAL OPERATIONS AND HELPFUL HINTS
1. Before cutting, make certain that the cutting arm and table area are at their correct settings and firmly locked in
place.
2. Before cutting, determine that the workpiece is the right size for the saw.
3. Place the workpiece on the table and hold or clamp it firmly against the fence.
4. For best results, cut at a slow, even cutting rate.
5. Never attempt freehand cutting (cutting a workpiece that is not held firmly against the fence and table).
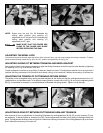
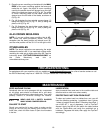
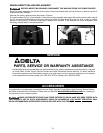
A
Fig. 38
Keep your hands out of the hazard zone while operating the saw. If the size of the workpiece would
cause your hand to be inside the table hazard zone (see section “TABLE HAZARD ZONE” SEE FIG.
21), use a clamp to secure the workpiece.
AUXILIARY WOOD FENCE
When performing multiple or repetitive cut-off operations that result in small cut-off pieces (one inch or
less), the saw blade can catch the cut-off pieces and project them out of the machine or into the blade guard and
housing, possibly causing damage and/or injury. In order to limit the possibility of personal injury or blade guard damage,
mount an auxiliary wood fence to your saw.
Holes are provided in the fence to attach an auxiliary fence (A) and (B) (Fig. 37). This auxiliary fence is constructed of
straight wood approximately 1/2” thick. Both sides A and B should be approximately 5.25" high by 11.5 inches long.
NOTE: The auxiliary fence (A) is used only with the saw blade in the 0° bevel position (90°) to the table. The auxiliary
fence must be removed for all bevel cuts (blade tilted).
MAKE SURE THAT THE FENCES ARE CLEAR OF THE GUARD AND BLADE BEFORE OPERATING SAW.
MACHINE USE