


15
IP2046/IM
Nov 2006
4.4 Setting up for the chosen application - the Main Menu.
Refer now to the main menu structure chart in Appendix A.
It is important to note that MSP400 programming is most easily accomplished by first selecting the duty
the transmitter is to perform.
Once a duty is selected (see section 4.4.1), a “mini-wizard” programming assistant is invoked and the
user is thereafter only asked for information relevant to the duty chosen. As the user is guided through the
menu, data input allows the mini-wizard to populate relevant parameters with application specific data in
the background, and then select the next step required to configure the transmitter for the chosen
application.
The user is strongly advised to enter the duty menu whenever programming the MSP400, thus invoking
the mini-wizard which will assist programming.
Once programmed, it is possible to review the data entered into or calculated by the MSP400 by stepping
through the main menu using the green button ↓.
Note however that this will be a manual navigation of the MSP400 menu, and that
all
menu items will be
shown in this procedure, regardless of the duty chosen; the mini-wizard is only invoked if the user enters
and scrolls through or selects/refreshes a duty choice.
In a manual navigation down the main menu, simply ignore those menu items shown that do not relate to
your application.
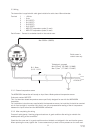
4.4.1 Selecting the duty: Screen display: dutY
Factory default setting: Level
The MSP400 may be programmed to perform one of 4 duties:
• Distance measurement
• Level measurement (factory default setting)
• Flow measurement
• Contents measurement
To change the duty:
a) Press the green button ↓ to display the “dutY” menu entry screen.
b) To confirm or change the duty from Level to one of the other duties, thus invoking the mini-wizard,
press the blue button → to enter the “dutY” menu. Press the blue button → again to allow change of
the duty. The current duty will now be flashing, indicating it may be confirmed or changed.
c) Press the green button ↓ to scroll through the list of available duty options, or press the red button ↵ if
the duty displayed is correct
d) Once the desired duty is shown (flashing) on the display, press the blue button → to select this duty. It
will now stop flashing.
e) If the chosen duty is incorrect, the edit sequence for the duty can be re-started by pressing the blue
button → again.
If the chosen duty is correct, press the red button ↵ to save the duty to memory and automatically
scroll on to the next main menu option: units.
Note that the arrow icon to the left of the display will now show the duty chosen and saved.