


23
IP2046/IM
Nov 2006
4.4.10 Setting the 4mA point Screen Display: 4
Factory default value: 0.000
Enter the value of the PV which you require to be signalled by 4mA
The 4mA point may be set above or below the 20mA point to suit the monitoring or control equipment.
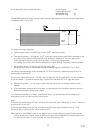
If you wish to set the 4 and 20mA points by ranging the MSP400 to a fixed target, such as the level in
the vessel at any particular time or a fixed target at a known distance away, skip these menu options now
by pressing the green button D 2 times to arrive at the set damping option.
To edit the 4mA point
a) Press the blue button → to enter the 4mA menu and to display the current value in use. If this is
correct, press the red button ↵ return to the main menu.
If the 4mA point is to be edited, press the blue button → again to allow editing
The leading digit of the current 4mA value will now be flashing, indicating it may be changed.
b) Use the green button D to edit the value of the leading digit.
c) Once correct, use the blue button → to select the next digit and then the green button D to edit as
before, or the blue button → to move to the next digit. Continue this sequence until all 5 digits are
correct.
If the new 4mA value is incorrect, the edit sequence for the 4mA point can be re-started by pressing the
blue button → again.
If the 4mA value is correct, press the red button ↵ to save the new value to memory and automatically
scroll on to the next main menu option: “20”
4.4.11 Setting the 20mA point Screen Display: 20
Factory default value: 10.550
Enter the value of the PV which you require to be signalled by 20mA
The 20mA point may be set above or below the 4mA point to suit the monitoring or control equipment.
To edit the 20mA point
a) Press the blue button → to enter the 20mA menu and to display the current value in use. If this is
correct, press the red button ↵ return to the main menu.
If the 20mA point is to be edited, press the blue button → again to allow editing
The leading digit of the current 20mA value will now be flashing, indicating it may be changed.
b) Use the green button D to edit the value of the leading digit.
c) Once correct, use the blue button → to select the next digit and then the green button D to edit as
before, or the blue button → to move to the next digit. Continue this sequence until all 5 digits are
correct.
d) Press the blue button → a final time to confirm the new value. None of the digits should now be
flashing.
If the new 20mA value is incorrect, the edit sequence for the 20mA point can be re-started by pressing
the blue button → again.
If the 20mA value is correct, press the red button ↵ to save the new value to memory and automatically
scroll on to the next main menu option: “d”