


9
English
To Turn the Laser Off:
Rotate the ON/OFF Knob counterclockwise until it clicks OFF and the
laser diodes shut down. The POWER LED Light will no longer be illu-
minated.
ROTATION SPEEDS
The Variable Speed Knob can be used to improve your visibility or
detection of the laser beam. The slower the rotation speed, the brighter
the laser line will appear. The faster the rotation speed, the more solid
the laser line appears. Always remember to operate your laser in HIGH
(600 RPM) speed when working with the Digital Laser Detector.
Remember: Slow Speed = Bright Beam; Fast Speed = Solid Beam.
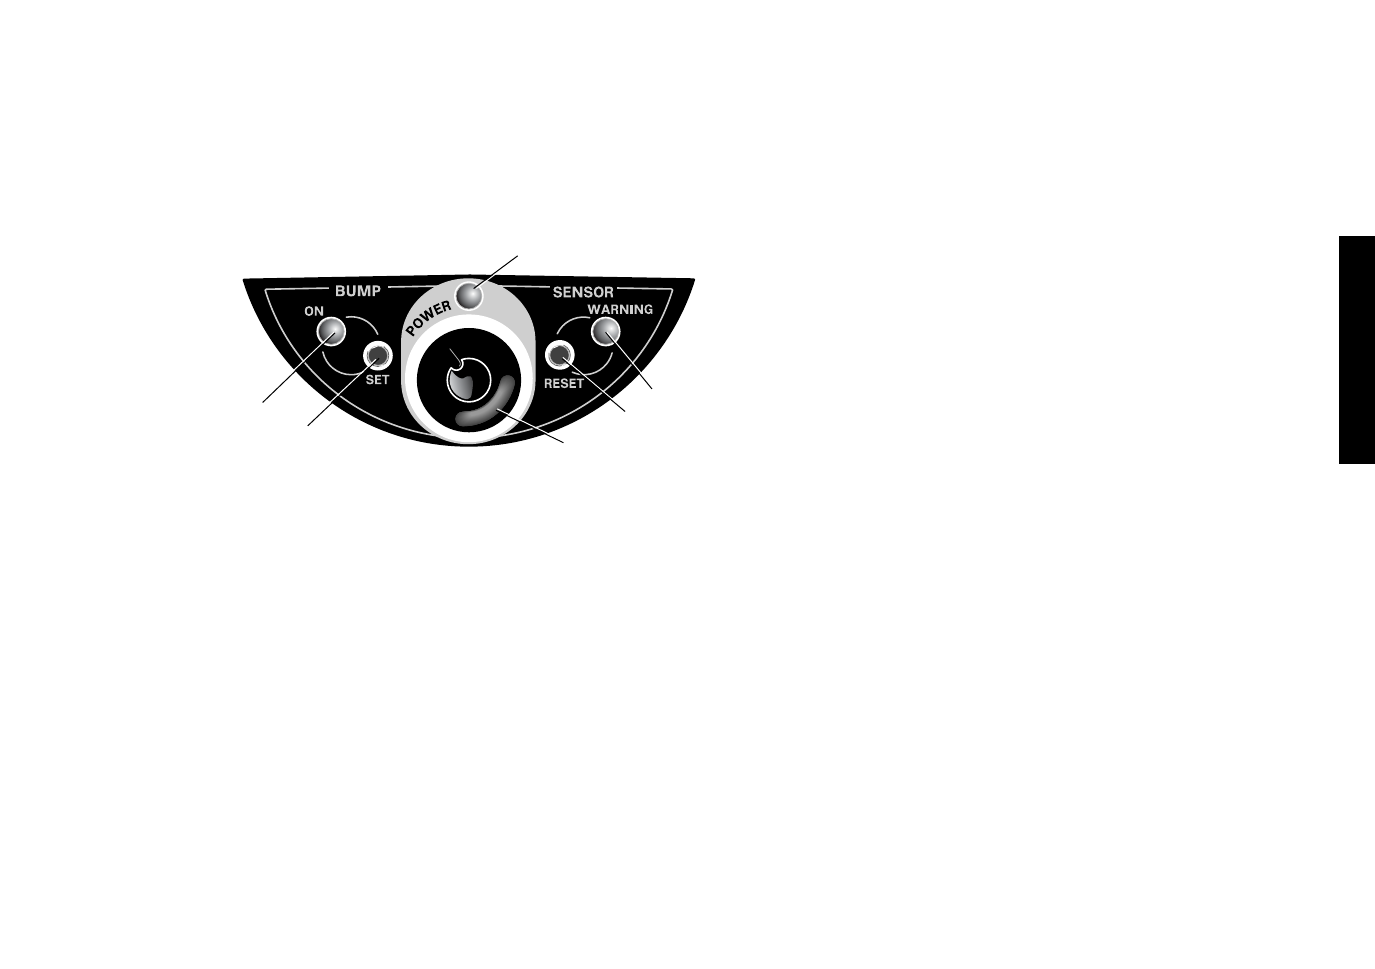
Bump Sensor
The DW073 Cordless Rotary Laser is equipped with a BUMP SEN-
SOR that will warn you if the laser level has been bumped after set up
and leveling. If properly used, this feature can help increase the accu-
racy of your work by insuring that you continue to work off of the same
level/plumb position that you initially set the laser to. The Bump Sensor
IS NOT AN OUT OF LEVEL SENSOR. It can not and will not warn you
if the laser has gone out of level without being bumped. Check your
level/plumb position often to ensure the accuracy of your work.
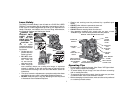
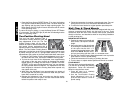
A
B
C
D
E
F
BUMP SENSOR CONTROLS
The Bump Sensor is activated as soon as you turn the laser power ON
and will remain active until you turn the laser power OFF. Through the
use of the Bump Sensor Controls, you can choose how the laser
warns you in the event it has been bumped. There are two settings to
choose from.
SETTING 1
FLASHING LED WARNING LIGHT ONLY
With a fully charged battery properly inserted, turn the laser power
ON. The Bump Sensor is automatically activated.
• Level the laser to establish a benchmark.
• Choose your rotation speed.
• If the laser level is bumped, the Bump Sensor WARNING LED (E)
will flash to warn you.
• To continue working, recheck the laser to your benchmark and re-
level if necessary.
• Press the Bump Sensor RESET Button (F) to clear the flashing
LED light and reset the Bump Sensor circuit.
SETTING 2
FLASHING LED WARNING LIGHT, FLASHING LASER DIODES,
AND ROTATION STOP
With a fully charged battery properly inserted, turn the laser power
ON. The Bump Sensor is automatically activated.
• Level the laser and establish a benchmark.
• Choose your rotation speed.
• Press the Bump Sensor SET Button (C) to activate the second
operating mode. The Bump Sensor ON LED Light (D) will illu-
minate.
• If the laser level is bumped, the Bump Sensor WARNING LED (E)
will flash, the dual laser diodes will flash and rotation of the laser
head will stop, if the rotary head was spinning.
• To continue working, recheck the laser to your benchmark and re-
level if necessary.