


16
English
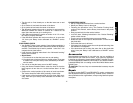
• Mount your Rotary Laser on a tripod so it is aimed front-to-back
toward the vertical surfaces. (next page)
• Level the Laser, following the procedure in the “Horizontal
Leveling” section of this manual.
• Quick Check:
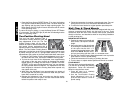
1. Compare the position of the bubbles in the front and rear vials
(Fig. AA).
2. If the two bubbles are not in about the same position in their
vials, (both about centered) have your Rotary Laser calibrated
at a D
EWALT service center.
• Turn the unit on so that the lasers are on and rotating.
• Go to surface #1 and mark the center of the beam. If it is difficult
to see the beam, use your Laser Enhancement Glasses, Target
Card or optional DW0732 Digital Laser Detector.
• Go to surface #2 and mark the center of the beam.
• Loosen the screw holding the Laser to the tripod, but do not
remove the Laser.
• Rotate the Laser 180˚ (Fig. BB)
• Level the Laser again, following the procedure in the “Horizontal
Leveling” section of this manual.
• Turn the unit on if it is not already on, so the lasers are on and
rotating.
• Go to surface #1 and mark the center of the beam.
• Go to surface #2 and mark the center of the beam.
• Measure the difference between the marks on surface #1.
• Measure the difference between the marks on surface #2.
• The difference between the marks on surface #1 must equal the
difference between the marks on surface #2. If these are not
equal, there was user set up or marking error.
• If the difference between the marks on surface #1 is 1/4" or less,
the Laser is properly calibrated.
• If the difference between the marks on surface #1 is more than
1/4", have your Rotary Laser calibrated at a D
EWALT service
center.
HORIZONTAL CHECKING FOR SIDE-TO-SIDE TILT ERROR
• Set up tripod midway between 2 vertical surfaces 100' from each
other.
• Mount your Rotary Laser on a tripod so that it is aimed side-to-side
toward the vertical surfaces.
• Level the Laser, following the procedure in the “Horizontal
Leveling” section of this manual.
• Turn the unit on so that the lasers are on and rotating.
• Go to surface #1 and mark the center of the beam. If is difficult to
see the beam use one of the aids mentioned earlier.
• Go to surface #2 and mark the center of the beam.
• Loosen the screw holding the Laser to the tripod but do not
remove the Laser.
• Rotate the Laser 180˚.
• Level the Laser again, following the procedure in the “Horizontal
Leveling” section.
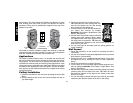
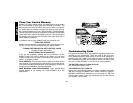
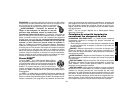
APPROX. 50 FT.APPROX. 50 FT.
APPROX. 50 FT.APPROX. 50 FT.
BEAM
BEAM
FIG. AA - UNIT FACING RIGHT
FIG. BB - UNIT FACING LEFT
SURFACE 1 SURFACE 2
SURFACE 1 SURFACE 2