


10
English
• Press the Bump Sensor RESET Button (F) to clear the flashing
LED light and reset the Bump Sensor circuit. The laser diodes will
stop flashing and the rotary head will begin spinning again. The
Bump Sensor ON LED Light will remain lit and the tool will remain
in this operating mode.
To return the circuit to setting 1, press the Bump Sensor SET Button
(C) once again. The ON LED Light (D) will shut off indicating that the
laser is in operating mode 1.
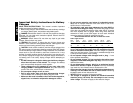
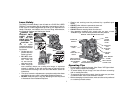
Two-Position Pivoting Head
This tool has been designed with a
Two-Position Pivoting Head for quick and
easy adjustments on the job. The Two-
Position Pivoting Head can be used to
position the laser for both horizontal (level)
and vertical (plumb) applications and to
adjust the laser for use with the built in Wall
Mount. The Two-Position Pivoting Head is
designed to lock the laser level into two predetermined positions (level
& plumb) through the use of a spring-loaded detent pin. To make
adjustments to the position of the laser head follow these instructions.
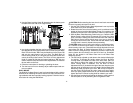
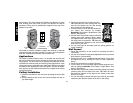
1. Locate the Two-Position Pivoting Head Adjustment Lever (A) on
the side of the laser level, next to the “DANGER” warning label.
2. To pivot the laser head lift the Adjustment Lever approximately
one quarter of the way open, enough to disengage the spring-
loaded detent pin holding the laser head in position. DO NOT
ATTEMPT to fully open the Adjustment Lever, you may damage
the spring-loaded detent mechanism. The Adjustment Lever has
been designed to release the Pivoting Head when opened only
one quarter of the way.
3. While lifting the Adjustment Lever approximately one quarter of
the way open with one hand, pivot the laser head with your other
hand until it travels 90º to a stop.
4. Release the Adjustment Lever and make sure that the spring-
loaded detent pin locks into place. The laser head should now be
locked into position and ready for use.
A
5. Follow the instructions for leveling or plumbing the laser. For posi-
tioning the tool for use on a wall see the Wall Mount section.
6. To return the laser head to its original position repeat steps 2-4.
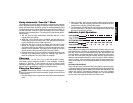
Wall, Floor & Tripod Mounts
The DW073 Cordless Rotary Laser has been designed with the most
common accessories built directly into the base of the tool. These
accessories allow the laser to be mounted onto tripods, positioned
directly on the floor, and attached to walls for drop ceiling installation
or other leveling jobs.
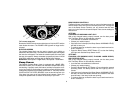
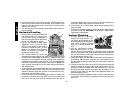
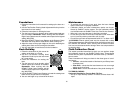
MOUNTING ON A TRIPOD
1. Position the tripod on a smooth and
level surface. Set tripod to desired
height.
2. Secure the laser to the tripod base
by screwing the threaded knob (A)
on the tripod into the 5/8" x 11
threaded insert on the bottom of the
laser level. NOTE: Be sure the tri-
pod you are working with has a 5/8" x 11 threaded screw.
3. Use the Two-Position Pivoting Head Adjustment Lever to pivot the
laser head for a level or plumb setting.
4. Follow the instructions for leveling or plumbing the laser.
5. Turn the laser on; adjust rotation speed and controls as needed.
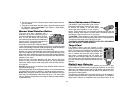
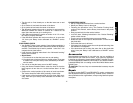
FLOOR MOUNT
The laser level can be positioned direct-
ly on the floor for leveling and plumbing
applications. Follow the instructions
below for using the floor mount.
1. Place the laser on a relatively
smooth and level surface
2. Use the Two-Position Pivoting
Head Adjustment Lever (A) to
pivot the laser head for a level or
plumb setting.
A
B
C
A