


307-638ą11
MAINTENANCE
Daily Care and Cleaning
WARNING
To
reduce the risk
of serious bodily injury
, including
splashing in the eyes or on the skin or electric
shock, always follow the Pressure Relief Proce-
dure
W
arning
on page 9 when shutting of
f the sys
-
tem,
when you stop spraying and before checking,
servicing,
installing, cleaning or
changing any part
in
the system.
CAUTION
Clean all parts with a non–conductive solvent,
compatible with the fluid being sprayed.
Conductive solvents can cause the gun to
malfunction.
Do
not use any cleaning method which may al
-
low
solvent into the gun air passages.
Solvent
left
in
the gun passages could result in a poor qual
-
ity paint finish and may draw current and reduce
the electrostatic effect. Point the gun down while
cleaning
to prevent dirty solvent from running back
into the air passages. NEVER IMMERSE THE
GUN
IN SOL
VENT.
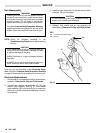
1.
Clean the fluid and air line filters daily
.
2. Clean the outside of the gun daily with a soft cloth
dampened
in a compatible solvent.
3. Clean the air cap and fluid nozzle daily, minimum.
Some applications require more frequent cleaning.
Replace
the fluid nozzle and air cap if they are dam
-
aged.
See
Clean the Air Cap and Fluid Nozzle
.
4. Check
the
electrode wire. Straighten if bent, and re
-
place if broken or damaged. See
Electrode Needle
Replacement.
5. Check
all of
the work hangers for build-up of material;
clean
them, if necessary
.
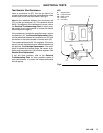
Clean the Air Cap and Fluid Nozzle
CAUTION
Do
not use metal tools to clean the air cap holes as
this may scratch them, and make sure the elec-
trode
wire is not damaged. Scratches in
the air cap
holes
or a damaged electrode wire can distort the
spray
pattern.
Equipment needed:
Soft bristle brush (supplied).
Fluid nozzle wrench (supplied).
Solvent compatible with fluid being sprayed.
Procedure:
1. Follow
the
Pressure Relief Procedure W
arning
on
page
9.
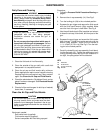
2.
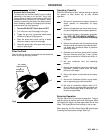
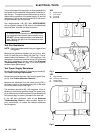
Remove the air cap assembly (14). See Fig 6.
3. T
urn the locking pin (84) to the unlocked position.
4. Squeeze
the gun trigger and remove the fluid nozzle
with the fluid nozzle wrench (59g) supplied. Make
sure
the front of the gun is held down. See Fig 6.
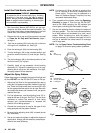
5. Use
the soft bristle
brush (59a) supplied and solvent
to
clean the air cap, fluid nozzle, and front part of the
gun.
6. Squeeze the gun trigger and screw the fluid nozzle
back into gun. Tighten the nozzle securely with the
wrench (59g) supplied. Torque the fluid nozzle to
1.1–1.4
N
S
m (10–12
in–lb). See Fig 6. T
urn the lock
-
ing
pin to the locked position.
7. Carefully
reinstall the air cap assembly
. A
void bend
-
ing
the electrode (12). T
ighten the retaining nut so it
is
snug,
allowing the air cap to turn with resistance. If
too
tight, the spray pattern will be distorted.
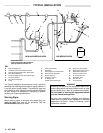
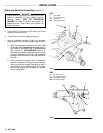
Fig 6
KEY
12 Electrode
13 Fluid
Nozzle
14
Air Cap Assembly
59g Wrench
12
13
14
T
orque to
1.1–1.4 N
Sm
(10–12 in–lb)
59g