


18 307-638
SERVICE
Gun Disassembly
ăWARNINGĂ
Installing and servicing this equipment requires
access to parts which may cause electric shock
or otherserious bodilyinjury if thework isnot perĆ
formed properly. Do not install or service this
equipment unless you are trained and qualified.
Follow the Pressure Relief Procedure Warning,
page 9,before servicingthegun orany partof the
system. Disconnect the fluid hose from the gun.
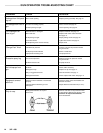
NOTE: Check all possible remedies in the
Troubleshooting Charts before disassembling
the gun.
CAUTION
If the plastic parts of the gun must be held seĆ
curely, ALWAYS clamp them in padded vice jaws
to prevent damage to the parts.
ALWAYS lubricate o-rings and seals with petroĆ
leum jelly.
ALWAYS remove gun from worksite for service or
repair. Service or repair area must be clean.
Flush the gun as described under Flush the Spray
Gun. Follow the Pressure Relief Procedure Warning
on page9. Disconnectthe airand fluidline fromthe gun.
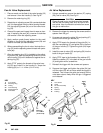
Electrode Replacement
1. Remove theair capassemblyand fluidnozzle asdeĆ
scribed in Clean the Air Cap and Fluid Nozzle.
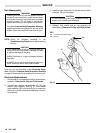
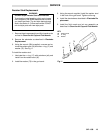
2. Unscrew and remove the electrode (12) with the
wrench (59c) supplied. See Fig 10. If the needle
shaft assembly (45) turns while trying to loosen the
electrode, hold theneedle shaft assembly nut with a
small wrench.
3. Install the new electrode (12) with the wrench (59c)
supplied. Do not overtighten.
CAUTION
To avoid damaging the plastic threads, be very
careful when installing the electrode.
4. Reinstall fluid nozzle and air cap assembly as
described in Clean the Air Cap and Fluid Nozzle.
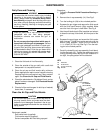
Fig 10
KEY
45 Fluid Needle Shaft Assembly
59c Wrench
59c
45