


20 307-638
SERVICE
Barrel Removal
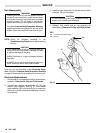
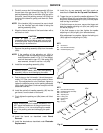
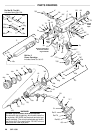
1. Unscrew the nut (19) at the barrel fluid inlet. See Fig
12.
2. Pull the fluid tube (20) out of the fluid inlet.
3. Remove the trigger by removing the screws and
spacers from the gun.
4. Remove the ES indicator lights from the socket
head capscrews (30).
5. Using the wrench (59f) supplied, loosen and reĆ
move the two socket head capscrews (30) from the
gun.
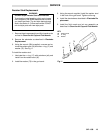
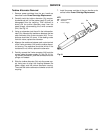
6. Hold the gun handle (2) with one hand and pull
straight up to remove the gun barrel (18). See Fig
13.
CAUTION
To avoid damaging the power cartridge, always
pull the gun barrel straight away. If necessary,
gently move the gun barrel from side to side to
free it from the gun handle.
NOTE: The gasket (46) should be left in the gun handle
(2) if the gasket is not to be replaced.
To install the barrel (18), follow the procedure below:
1. Be sure the gasket (46) is in place. Replace if damĆ
aged. Place the barrel over the power cartridge (3)
and onto the gun handle (2). See Fig 13.
2. Install the two socket head capscrews (30) and
tighten with the wrench (59f) supplied. See Fig 12.
3. Snap the ESindicator lights in place over the socket
head capscrews (30).
4. Insert the fluid tube (20) into the fluid inlet of the gun
barrel and tighten the nut (19).
5. Install the trigger with the screws and spacers. Test
the gun resistance as instructed on page 16.
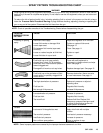
Fig 12
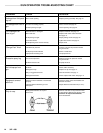
Fig 13
KEY
19 Nut
20 Fluid Tube
30 Capscrew
59f Wrench
20
59f
30
19
KEY
2 Gun Handle
3 Power Cartridge
18 Gun Barrel
46 Gasket
2
18
46
3
Fluid Needle Packing Replacement
1. Remove theair capassemblyand fluidnozzle asdeĆ
scribed in Clean the Air Cap and Fluid Nozzle.
2. Remove the electrode as described under
Electrode Replacement.
3. Remove the gun barrel as described under Barrel
Removal.
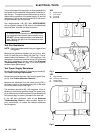
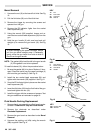
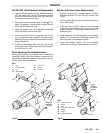
4. Unscrew the packing nut (45e) using the wrench
(59b) supplied. See Fig 14.
Fig 14
KEY
45e Packing Nut
59b Wrench
59b
45e