


-36-
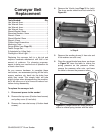
G0449/G0450 37" Drum Sander
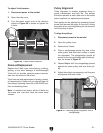
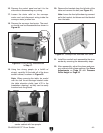
Figure 40. Gauge blocks in position for
adjusting the pressure roller height.
Note:
An additional trick for eliminating snipe is
to reduce pressure on the rear rollers, but not the
front rollers. Conditions will vary with wood types,
so use trial-and-error to find the best results for
your application.
These instructions will restore the pressure rollers
to the factory setting.
To adjust the pressure rollers to the factory
setting:
1. Disconnect power to the sander!
2. Open the top cover.
3. Place the gauge blocks on the conveyor table
and position them under all the pressure roll
-
ers, as shown in
Figure 40.
Tools Needed: Qty
Hex Wrench 4mm ..............................................
1
Wrenches/Sockets 14mm .................................
2
Gauge Blocks (see
Page 30) ............................ 2
Factory Setting:
Distance Below Rear Drum ........... 0.160" (4mm)
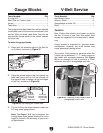
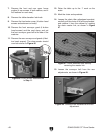
The pressure rollers are factory set at 0.160"
(4mm) below the bottom of the rear sanding drum
and are fully adjustable either up/down with the
two nuts shown in Figure 39. After the adjust
-
ment has been made, always lock the top hex nut
against the bottom to prevent it from moving.
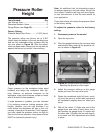
Pressure Roller
Height
Figure 39. Pressure roller adjustment hex nuts.
Proper pressure on the workpiece helps avoid
kickback and keeps the workpiece from slip-
ping. However, as pressure increases on the
workpiece, snipe also increases (snipe is normal
with all brands of drum sanders).
If snipe becomes a problem, you can minimize
it by reducing pressure (raising pressure roller
height). However, you can only minimize it so
much before the workpiece will slip or kick out,
causing a hazard to the operator. If this happens,
you have raised the pressure rollers too high for
them to function as intended—the pressure rollers
MUST be lowered to prevent injury.
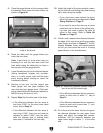
4. Adjust the conveyor table up so the gauge
blocks just touch the rear drum roller.
5. Rotate the handwheel eight full turns, count-
ing from the point of actual table movement
so handwheel freeplay does not affect your
count.
6. With all the rollers: 1) Raise one end off the
gauge block and move it back down until it
just touches the gauge block; 2) repeat with
the other side; 3) tighten the hex nuts togeth
-
er to make sure the adjustments are locked
in place.