


G0460/G0461 12" Sliding Table Saw
-29-
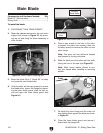
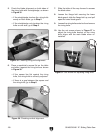
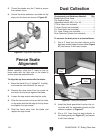
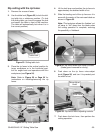
2. Place a framing square along the edge of
the sliding table and use the crosscut fence
adjustment screw (
Figure 45) to align the
fence perpendicular to the sliding table.
Note: Refer the instructions on Page 47 for
additional details on making the fence per
-
pendicular.
Figure 45. Crosscut fence adjustment screw.
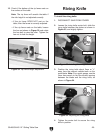
Crosscut Fence
Components and Hardware Needed: Qty
Crosscut Aluminium Fence ................................
1
Long Knobs M10-1.5 ...........................................
2
Flip Stops ...........................................................
2
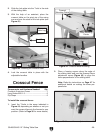
To install the crosscut fence:
1. Insert the T-bolts in the areas indicated in
Figure 44, depending on whether or not you
want the crosscut fence in the forward or rear
position. (Refer to
Page 36 for more details.)
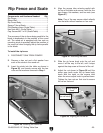
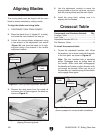
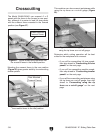
Figure 43. Installing the crosscut table.
4. Lock the crosscut table in place with the
adjustable handles.
T-Slot
2. Slide the lock plate into the T-slot in the side
of the sliding table.
3. With the help of an assistant, place the
crosscut table on the pivot pin of the swing
arm and over the studs of the lock plate (see
Figure 43).
Pivot Pin
Crosscut
Table Leg
Figure 44. Crosscut fence mounting.
Crosscut Fence
Knobs
Forward
Mounting Points
Rear Mounting
Points