


G0605X/G0606X Extreme Series 12" Table Saw
-19-
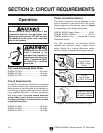
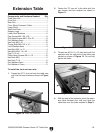
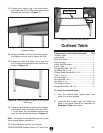
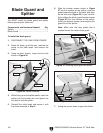
Extension Table
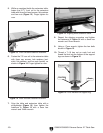
2. Fasten the 79" rear rail to the table with five
cap screws and lock washers as shown in
Figure 11.
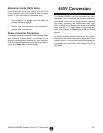
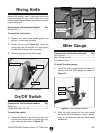
3. Thread two M10-1.5 x 25 hex bolts with flat
washers onto the right side of the table saw
cabinet as shown in
Figure 12. Do not fully
tighten the bolts.
Figure 12. Hex bolts installed.
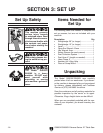
4. With the help of an assistant, place the exten-
sion table between the rails and slide the
table slots over the bolts installed in Step 3
.
Figure 11. Rear rail installed.
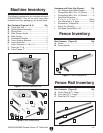
Components and Hardware Needed: Qty
Table Saw Unit ..................................................
1
Front Rail ...........................................................
1
Rear Rail ...........................................................
1
F ront (Main) Extension Table ............................
1
Lower Shelf ........................................................
1
Shelf End Plate ..................................................
1
Support Legs .....................................................
2
Lower Shelf Brackets ........................................
2
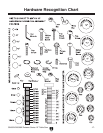
Cap Screws M8-1.25 x 25 ................................
8
Flat Head Screws M8-1.25 x 25 .......................
8
Flat Washers 8mm ......................................... 16
Hex Nuts M8-1.25 ............................................
8
Flange Bolts M8-1.25 x 12 ................................
9
Lock Washers 8mm .........................................
8
Hex Bolts M6-1 x 12 .........................................
4
Hex Bolts M10-1.5 x
25 .................................... 2
Feet
3
⁄8-16 x 2 ................................................... 2
Phillip Head Screws M6-1 x 12 ......................
12
Hex Nuts M6-1 .................................................
2
Hex Nuts
3
⁄8-16 ................................................. 2
Flat Washers 6mm .........................................
16
Flat Washers 10mm ..........................................
2
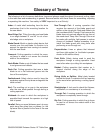
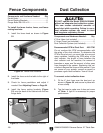
Figure 10. Front rail installed.
To install the front and rear rails:
1. Fasten the 91
3
/8" front rail onto the table saw
with five flat head screws as shown in
Figure
10.
Hex Bolts