


-22-
G0619 DELUXE SMALL MILL/DRILL
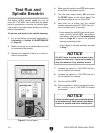
To mill a workpiece:
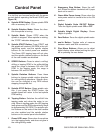
1. Refer to Control Panel on Page 20, and
learn the how to use the machine controls.
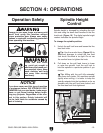
2. Zero the spindle height scale and select units
of measure
.
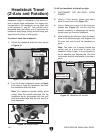
3. Clamp the workpiece to the milling table, and
adjust the headstock to the needed h
eight,
depth of cut, and milling
path.
Remember: Milling with the quill fully extend-
ed, can cause tool chatter. For maximum
spindle rigidity, keep the spindle retracted
into the headstock as far as possible with the
quill lock lever locked and the fine feed lock
knob tightened.
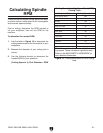
4. Refer to Calculating Spindle RPM on Page
22 to find the best spindle RPM.
5. Put on your safety glasses, turn the power
switch ON, and press the START button.
6. Push the FORWARD or REVERSE button to
select the appropriate cutting direction for the
type of cutter that you are using.
7. Press the SPEED button to select the appro-
priate milling speed for the diameter of cutter
and type of material to be cut.
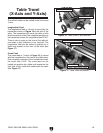
8. Use the X-axis or Y-axis handwheels to feed
the workpiece into the cutter slowly. If you are
only milling in one direction,
lock the unused
table slide in place. Refer to Table Travel on
Page 19 for lock lever location.
Milling/Drilling Mode Tapping Mode
Failure to follow RPM and Feed Rate
Guidelines may threaten operator safety
from ejected parts or broken tools
.
This mill/drill is designed to use most end mills,
drill bits, and face cutters that are 2" in diameter
or less. The milling table has a coolant trough with
drain for an optional cutting fluid system.
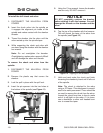
To drill and thread a hole:
1. Refer to Control Panel on Page 20, and
learn the how to use the machine controls.
2. Zero the spindle height scale and select units
of measure, and calculate your maximum
tapping depth without bottoming-out the tap
.
3. Clamp the workpiece to the milling table, and
adjust the headstock to the needed h
eight for
drilling and tapping
.
4. Put on your safety glasses, turn the power
switch ON, and press the START button.
5. Drill your hole with the appropriate speed and
drill bit size for the tap. For large holes you
may have to drill a pilot hole
.
6. Install the tap, and apply tapping fluid or oil
when needed
.
7. Push START, then the TAPPING button, and
then the SPEED button. The safest tapping
speed is
100 RPM.
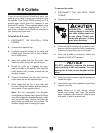
8. Begin threading, but without disengaging the
threads, frequently push the
FORWARD and
REVERSE buttons on the downfeed handles
to cut and
back-out the tap to eject the chips
from the hole and prevent thread galling
.
Failure to follow RPM and Feed Rate
Guidelines may threaten operator safety
from ejected parts or broken tools
.
This mill/drill is designed to change spindle direc
-
tion without stopping the spindle first. The wayed
column allows for drill and tap changes and head
-
stock repositioning without loosing the tool reg
-
istration. Using the mill/drill in the tapping mode
takes some level of skill, so make sure to practice
using this feature.
Avoid cutting threads in blind
holes where the tap may bottom out and
break
before you can push the
REVERSE button.