


Model G0771 (Mfd. Since 8/15)
-33-
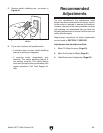
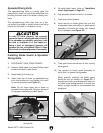
Enabling Pawls
To enable the pawls, re-install retaining spring,
pawls, washers, cap screw, and locking hex nut
onto blade guard assembly. Do not overtighten.
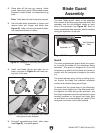
When to Use the Blade Guard
The blade guard assembly MUST always be
installed on the saw for all normal through cuts
(those where the blade cuts all the way through
the thickness of the workpiece). If the blade
guard is removed for specific operations, always
immediately replace it after those operations are
complete.
When Not to Use the Blade Guard
The blade guard cannot be used on any non-
through cuts (those in which the blade does
not cut all the way through the thickness of the
workpiece).
IMPORTANT: Whenever the blade guard can-
not be used, the spreader/riving knife must be
installed.
Sometimes the blade guard or its components
can get in the way when cutting very narrow
workpieces or other specialized cuts. Because
the blade guard is provided to decrease your risk
of injury, it should not be used if it gets in the way
of making a safe cut. Use good judgment!
Riving Knife
The spreader also functions as riving knife, which
works in the same manner as the spreader, but is
used for non-through cuts. It is a metal plate that
prevents the newly cut workpiece from pinching
the backside of the blade and causing kickback.
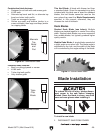
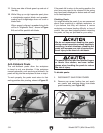
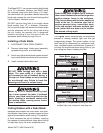
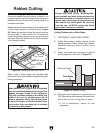
Height Difference
Minimum 1mm
Maximum 5mm
Figure 57. Example of height difference between
riving knife and blade.
Similar to the spreader, the riving knife acts as
a barrier behind the blade to reduce the risk of
hands being pulled into the blade if kickback
occurs.
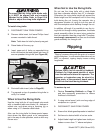
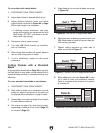
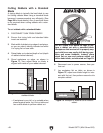
When used as a riving knife, the spreader/riv-
ing knife must be kept within the range shown in
Figure 58. For that reason, a 10" blade is required
for operations that use a riving knife.
Minimum 3mm
Top Distance
Bottom Distance
Maximum 8mm
Minimum 3mm
Maximum 8mm
Figure 58. Example of allowable top and bottom
distances between riving knife and blade.