


-42-
Model G0771 (Mfd. Since 8/15)
Making Auxiliary Fence
The auxiliary fence is necessary if you are
resawing a workpiece that is taller than it is wide.
The fence should be no less than
1
⁄2" shorter than
the board to be resawn.
IMPORTANT: Installation requires permanent
modification to the Model G0771 table saw
fence—specifically drilling mounting holes.
The fence should be similar to the one in Figure
74 when installed.
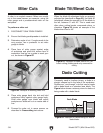
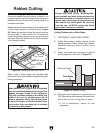
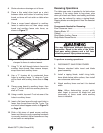
3"
26.5"
Hole Location Channel
29.5"
5
/
32
"
14.75"
Figure 75. Location to mark holes in fence.
Components Needed:
Barbed T-nuts #10-24 ........................................3
Flat Head Screws #10-24 ...................................3
Wood*
3
⁄4" x 4" x Length of Fence ......................1
Scrap Board .......................................................1
*Only use furniture-grade plywood, kiln-dried
hardwood, or HDPE plastic to prevent warping.
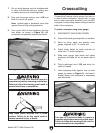
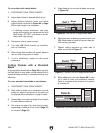
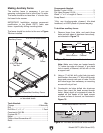
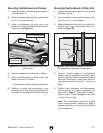
Figure 74. Example of auxiliary fence installed
on standard fence.
Fence
Auxiliary Fence
#10-24 Barbed
Tee Nut
#10-24 Flat Head Screw
Assembled Auxiliary Fence
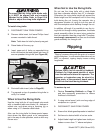
To build an auxiliary fence:
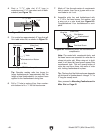
1. Remove fence from table, and mark three
holes on both sides of aluminum fence body,
as indicated in Figure 75.
Tools Needed: Qty
Clamps ............................................... 2 Minimum
Drill ....................................................................1
Drill Bits
1
⁄8",
3
⁄16",
1
⁄4" ................................ 1 Each
Countersink Drill Bit ............................................1
Forstner Bit
3
⁄4"....................................................1
Mallet ..................................................................1
Phillips Head Screwdriver #2 .............................1
Ruler ...................................................................1
2. Using a
1
⁄8" drill bit, drill a pilot hole into each
hole location, then use a
3
⁄16" bit to drill through
fence and connect each pair of holes. Do not
drill holes larger than necessary or mounting
screws will not pull out.
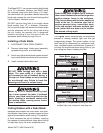
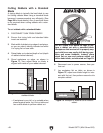
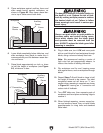
3. Countersink six holes drilled into aluminum
fence, then insert flat head screws through
holes. Adjust depth of countersink holes as
needed so that heads of flat head screws
sit below surface of channel, as illustrated in
Figure 76.
Countersink
Flat Head
Screw
Screw Head Below This Line
Fence
Figure 76. Flat head screw below fence channel.
Note: Make sure holes are located exactly
5
⁄32" below top edge of channel. If you place
hole in center of channel, drill bit will run into
a support wall.