


Model G0771 (Mfd. Since 8/15)
-37-
Cutting Dadoes with a Dado Blade
Because dado blades are much wider than stan-
dard blades, they place a greater amount of force
against the workpiece when cutting. This addition-
al force increases the risk of kickback, requiring
the operator to take additional steps when cutting
to keep their injury risk at an acceptable level.
The Model G0771 can accommodate dado blades
up to 10" in diameter. However, you MUST install
the included riving knife while using a 10" diam-
eter dado blade, as it provides a barrier behind the
blade and reduces the risk of hands being pulled
into the blade if kickback occurs.
DO NOT use the riving knife if you install a dado
blade smaller than 10" in diameter. Otherwise,
the riving knife height will exceed the blade height
and the workpiece will hit the riving knife during
the cut, forcing the operator into a dangerous
situation and trying to turn the saw off with the
workpiece stuck halfway through the cut.
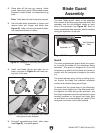
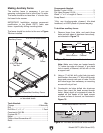
Installing a Dado Blade
1. DISCONNECT SAW FROM POWER!
2. Remove table insert, blade guard assembly,
spreader/riving knife, and saw blade.
3. Attach and adjust dado blade system accord-
ing to dado blade manufacturer’s instructions.
4. Install included dado table insert.
Never try to cut a warped board by hold-
ing it down against the table. If kickback
occurs, your hand could be pulled into the
blade, resulting in accidental contact with
the rotating blade, causing severe lacera-
tions or amputation.
DO NOT make through cuts with a dado
blade. The extra width of a dado blade
will increase the risk of kickback during a
through cut. Dado blades are only intended
for non-through cuts. Failure to heed this
warning could result in serious injury.
Dado blades have a higher risk of kickback
than normal blades because their larger size
applies stronger forces to the workpiece.
This risk increases relative to the depth and
width of the cut. To minimize your risk of
serious personal injury, ensure that stock
is flat and straight, and make multiple light
cuts (rather than one deep cut) to achieve
the desired cutting depth.
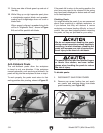
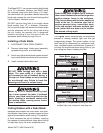
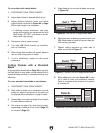
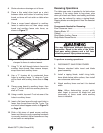
Figure 65. Example of dado being cut with
multiple light cuts, instead of one deep cut.
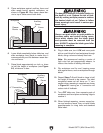
The Figure below demonstrates the sequential
process of making multiple, light cuts that get
progressively deeper. The actual number of cuts
used should be determined by workpiece hard-
ness, total dado depth, and feed rate. In general, if
you hear the motor slow down during the cut, you
are cutting too deep or feeding too fast.
Dado Blade
Workpiece
Fence
Cut 1
Workpiece
Fence
Cut 2
Workpiece
Fence
Cut 3
Finished
Dado Cut
Workpiece
Fence