


Model G0771 (Mfd. Since 8/15)
-43-
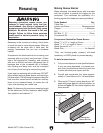
Resawing Operations
The table saw motor is pushed to its limits when
resawing. If the motor starts to bog down, slow
down your feed rate. Motor overloading and blade
wear can be reduced by using a ripping blade.
Ripping blades are designed to clear the sawdust
quickly.
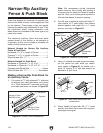
Components Needed for Resawing:
Zero-Clearance Insert ........................................1
Ripping Blade 10" ...............................................1
Clamps ...............................................................2
Shop-Made Auxiliary Fence ...............................1
Shop-Made Resaw Barrier .................................1
To perform resawing operations:
1. DISCONNECT SAW FROM POWER!
2. Remove standard table insert and blade
guard assembly.
3. Install a ripping blade, install riving knife,
lower blade below table surface, then install
zero-clearance table insert.
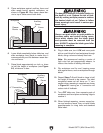
You may experience kickback during this
procedure. Stand to the side of the blade
and wear safety glasses and a full face
shield to prevent injury when resawing.
4. Attach auxiliary fence and set it to desired
width.
Note: When determining correct width,
don't forget to account for blade kerf and
inaccuracy of fence scale while auxiliary
fence is installed.
4. Shake aluminum shavings out of fence.
5. Place a thin metal shim (such as a ruler)
between table and bottom of auxiliary fence
board, so fence will not catch on table when
moved.
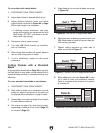
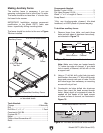
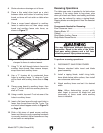
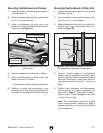
6. Place a scrap board adjacent to auxiliary
fence to reduce tear out, then clamp scrap
board and auxiliary fence onto fence, as
shown in Figure 77.
Scrap Board
Auxiliary Fence
Figure 77. Scrap board and auxiliary fence
clamped to fence to reduce tearout.
8. Use a
3
⁄4" forstner bit to countersink three
holes in auxiliary fence
1
⁄16" deep so T-nuts
will be flush with auxiliary fence face in Step
10.
9. Clamp scrap board to auxiliary fence, then
use a
1
⁄4" drill bit to drill into auxiliary fence for
shaft of T-nuts.
10. Using a mallet, tap each T-nut into one of the
holes in auxiliary fence.
11. Insert a flat head screw through each hole in
fence, then thread them into the T-nuts. The
end result should appear similar to Figure 74
on Page 42.
12. Slide a flat piece of wood across auxiliary
fence and fence to verify mounting hardware
is correctly installed. Adjust fasteners so they
do not catch on workpieces.
7. Using
3
⁄16" bit, drill through holes in fence into
auxiliary fence board, then remove clamps,
scrap board and auxiliary fence.