


-66-
Model G0771 (Mfd. Since 8/15)
Fence Scale
Calibration
Table/Dado Insert
Adjustment
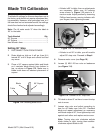
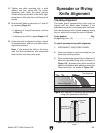
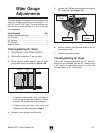
The fence scale windows, shown in Figure 128,
can be calibrated with the fence scale by loosen-
ing the mounting screws and sliding them in the
desired direction. The indicator window on the
right side is used when the fence is positioned to
the right side of the blade. The indicator window
on the left is used when the fence is positioned on
the left side of the blade.
IMPORTANT: Do not use the fence on the left
side of the blade if it has been purposely offset,
and is not adjusted parallel with blade.
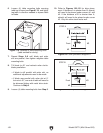
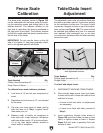
The table/dado insert must sit perfectly flush with
the table to provide a smooth, continuous surface
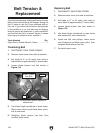
for the workpiece to slide over. The insert is held
in place by a magnet and sits on top of five adjust-
ment screws (see Figure 129). The insert should
be checked and adjusted any time it is removed
and replaced, after prolonged use, or any time
you notice the workpiece does not slide smoothly
across the insert.
Tools Needed Qty
Phillips Head Screwdriver #2 ............................ 1
Scrap Piece of Wood......................................... 1
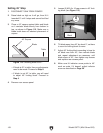
To calibrate fence scale indicator windows:
1. Lock fence at 13" and cut your scrap piece of
wood.
2. Reposition and lock fence at 12", as indicated
by the scale.
3. Flip over your scrap piece of wood, placing
side that was cut in Step 1 against fence,
then make your cut.
4. Measure width of freshly cut workpiece at
both ends with a tape measure. Workpiece
width should be exactly 12" at front and back.
If it is not, then adjust indicator window to
match width of workpiece.
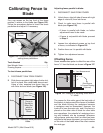
Figure 128. Fence indicator windows.
Left Indicator
Window
Right Indicator
Window
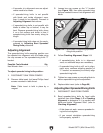
Figure 129. Location of table/dado insert holes
with adjustment screws.
Tools Needed Qty
Phillips Head Screwdriver #2 ............................ 1
Straight Edge ..................................................... 1
To check and adjust insert:
1. DISCONNECT MACHINE FROM POWER!
2. Place straight edge across insert and check
to make sure insert is flush with table at front
and back of throat.
— If insert is flush with table, no adjustments
are necessary.
— If insert is not flush with table, proceed to
Step 3.
3. Insert screwdriver through holes shown in
Figure 129 and either loosen screws to raise
insert, or tighten screws to lower it. Repeat
Steps 2–3 until insert is perfectly flush with
surface of table.