


SKU 93380 For technical questions, please call 1-800-444-3353. Page 14
ASSEMBLY INSTRUCTIONS
NOTE:
For additional information regarding the parts listed in the
following pages, refer to the Assembly Diagrams on pages 32, 33, and 34.
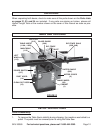
1. CAUTION! Always make sure the Power Switch (137) of the Table Saw is in
its “OFF” position and the tool is unplugged from its electrical outlet prior to
assembling the tool, adding any accessories, or making adjustments to the tool.
Because of the weight of the product, assemble and set up should be performed
by at least 2 people.
To Install The Left And Right Wings:
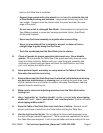
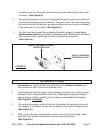
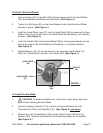
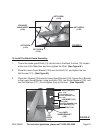
1. Attach the Left Wing (113) and Right Wing (114) to the Main Table (115), using
three Bolts (111) and three Flat Washers (112) for each Wing. Finger tighten
only. (See Figure G.)
2. Align the fronts of the Left Wing (113) and Right Wing (114) with the top of the
Main Table (115) directly above the front Bolts (111), and flush with the edge of
the Main Table. Then, firmly tighten the front Bolts. (See Figure G.)
3. Align the rears of the Left Wing (113) and Right Wing (114) with the top of the
Main Table (115) directly above the front Bolts (111), and flush with the edge of
the Main Table. Then, firmly tighten the front Bolts. (See Figure G.)
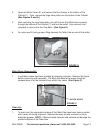
Selecting A Proper Location For The Table Saw:
1. The location selected for the Table Saw must be level, dry, well lighted, and have
room enough to allow movement around the Saw with long pieces of woodstock.
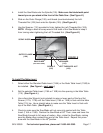
2. Once located, set a carpenter’s level on the Main Table (115) of the Table Saw
and level the machine from front to back and side to side. If necessary, use
shims (not included) under the corners of the Saw.
BOLTS (111)
FLAT WASHERS (112)
FIGURE G