


SKU 93380 For technical questions, please call 1-800-444-3353. Page 17
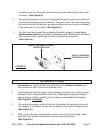
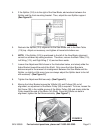
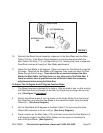
top of the Main Table. (See Figure L.)
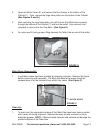
4. Check to make sure the Saw Blade will not come into contact with the Table
Insert (116A or 116B). Position the Saw Blade at 90. Then, raise and lower the
Saw Blade through its full range of motion. Also, rotate the Saw Blade, making
sure the Blade never contacts any part of the Table Insert. Repeat this proce-
dure with the Saw Blade in the 45 position.
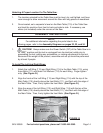
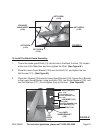
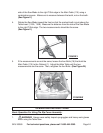
To Install The Table Insert:
1. Select either the Standard Table Insert (116A) or the Dado Table Insert (116B) to
be installed. (See Figure L,
next page.)
2. Set the selected Table Insert (116A or 116B) into the opening in the Main Table
(115). (See Figure L.)
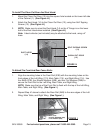
3. Use a 6mm Hex Wrench (not included) to raise or lower each of the four Set
Screws (117A, 117B) until the Table Insert (116A or 116B) is flush with the Main
Table (115) top. Use a straight edge to make sure the Table Insert is flush with
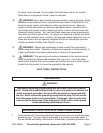
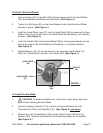
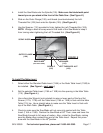
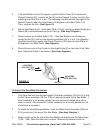
4. Install the Saw Blade onto the Spindle (105). Make sure the blade teeth point
toward you as you stand at the front of the Table Saw. (See Figure K.)
5. Slide on the Outer Flange (108), and thread (counterclockwise) the Left-
Threaded Nut (109) back onto the Spindle (105). (See Figure K.)
6. Use the Spanner (110) provided to firmly tighten the Left-Threaded Nut (109).
NOTE: Wedge a block of scrap wood in the teeth of the Saw Blade to keep it
from turning when tightening the Left-Threaded Nut. (See Figure K.)
SPANNER
(110)
SPINDLE
(105)
SAW BLADE
(NOT INCLUDED)
LEFT-THREADED NUT
(109)
OUTER FLANGE
(108)
SCRAP WOOD
FIGURE K
o
o