


SKU 93380 For technical questions, please call 1-800-444-3353. Page 25
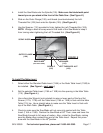
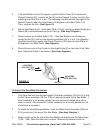
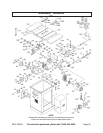
2. WARNING! When using the Rip Fence assembly (1B thru 27B), always
keep hands and fingers well away from the Saw Blade and cutting area.
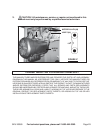
3. Set the Rip Fence assembly (1B thru 27B) on the Right Wing (114) of the Table
Saw. (See Figure X.)
4. Adjust the Rip Fence assembly (1B thru 27B) to the desired width of cut (distance
from Saw Blade to Rip Fence). Then, pull down on the Lock Lever (9B) to lock
the Rip Fence assembly in place. (See Figure X.)
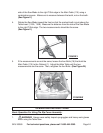
5. Place the workpiece on the Table Saw and firmly against the Rip Fence assembly
(1B thru 27B). (See Figure X.)
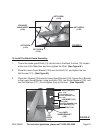
6. Plug the Power Cord Plug (130) into the nearest 220 volt, grounded, electrical
outlet.
7. Depress the green “ON” Button on the Power Switch (137) to turn on the Table
Saw. (See Figure X.)
8. When the Saw Blade is turning at full speed, slowly push the workpiece into
the Saw Blade. Do not force the Saw Blade to remove material faster than it is
designed to cut.
LOCK LEVER
(9B)
POWER SWITCH
(137)
ON
OFF
RIP FENCE ASSY.
(1B THRU 27B)
FIGURE X