


Page 12SKU 97009 For technical questions, please call 1-800-444-3353.
OPERATING INSTRUCTIONS
Read the ENTIRE IMPORTANT SAFETY INFORMATION section at the
beginning of this manual including all text under subheadings therein
before set up or use of this product.
Caution: Even though the unit is equipped with wheels and a carrying handle,
always seek help when wheeling the unit around the shop.
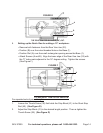
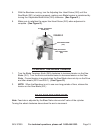
TO USE THE QUICK VISE
Place the workpiece between the Vise Jaws (9, 22) with the amount to be cut off
extending out past the Saw Blade (251). (See Figure C, next page.)
The Bandsaw is equipped with a quick action Vise Jaw mechanism which allows
you to instantly position the moveable Front Vise Jaw (9). (See Figure C.)
1.
2.
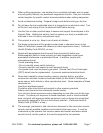
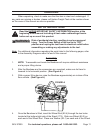
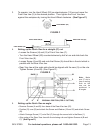
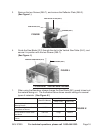
Rod. Insert one Cotter Pin (92-3) through the hole in each end of the Wheel Rod.
Make sure to bend the Cotter Pins to secure the Wheels in place.
(See Figure B.)
Screw in the two Levelers (93) into the two threaded mounting holes located
underneath the bottom/left side of the Stand (77S). (See Figure B.)
Carefully lower the Bandsaw to the oor surface. Then turn the two Levelers (93)
clockwise or counterclockwise to properly level the Stand (77S).
(See Figure B.)
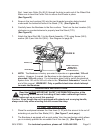
Attach the Hand Rod (98-1) to the Stand Assembly (77S) using Screw (98-2),
washer (98-3) and Hex Nut (98-4). See Diagram on page 39.
WHEEL ROD (92-4)
WHEEL (92-2)
WASHER (92-1)
COTTER PIN (92-3)
STAND (77S)
LEVELER (93)
FIGURE B
5.
6.
7.
NOTE: The Bandsaw is factory pre-wired to operate on a grounded, 120 volt
system. However, if rewired, the Bandsaw is also designed to operate on a
grounded, 240 volt system. For information about how to switch the electrical
system from 120 volt to 240 volt, refer to the “Electrical Schematics” toward the
end of this manual. WARNING! Only a qualied electrician should attempt
to rewire the Bandsaw.
8.