


Page 23SKU 97009 For technical questions, please call 1-800-444-3353.
Never attempt to remove material stuck in the moving parts of the Bandsaw
while it is plugged in and running. Turn off the Bandsaw if the workpiece is to be
backed out of an uncompleted cut.
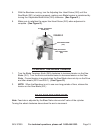
Once the cut is made, turn the Motor Toggle Switch (750S4) to its “OFF”
position. Turn the Coolant Pump Toggle Switch (750S2) to its “OFF” position.
Turn the Coolant Pump Fitting (91S) to its “CLOSED” position. The unplug the
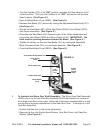
Power Cord (500) from its electrical outlet. (See Figure S.)
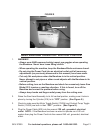
Wait until the Saw Blade (251) comes to a complete stop. Then remove the
workpiece and scrap material from the Vertical Saw Table (55-2).
(See Figure S.)
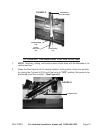
Turn the Cylinder (216) to its “ON” position. Slowly lower the Saw Head
Assembly to its horizontal position. Then turn the Cylinder to its “OFF” position
to lock the Saw Head Assembly in place. (See Figure S.)
BASIC BANDSAW OPERATION - HORIZONTAL POSITION
WARNING!
Always wear ANSI-approved safety impact eye goggles when operating
the Bandsaw.
When operating the machine, keep the Bandsaw Blade enclosure closed.
Do not plug the Power Cord into an electrical outlet until all necessary
adjustments (as previously discussed in this manual) have been made.
Before cutting, turn on the Bandsaw and check for excessively loose Saw
Blade (251) tension or machine vibration. If this is found, turn off the
Bandsaw and correct the problem before using.
Always keep hands and ngers safely away from the cutting area.
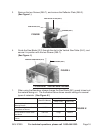
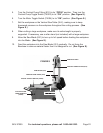
Turn the Cylinder (216) to its “ON” position, and raise the Saw Head to its full
vertical position. Then turn the Cylinder to its “OFF” position to lock the Saw
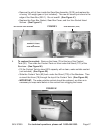
Head in place. (See Figure T, next page.)
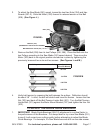
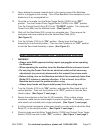
Secure the workpiece in the Vise (9, 22) assembly. When cutting a large
workpiece, make sure its entire length is properly supported. If necessary, use a
roller stand (not included) with a large workpiece. (See Figure T, next page.)
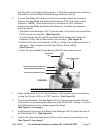
If cutting several workpieces at the same length, you may wish to adjust the Stop
Block (41) to the desired position. (See Figure T, next page.)
Check to make sure the Motor Toggle Switch (750S4) and Coolant Pump Toggle
Switch (750S2) are both in their “OFF” positions. (See Figure T, next page.)
11.
12.
13.
14.
1.
•
•
•
•
•
2.
3.
4.
5.