


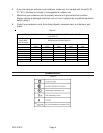


Page 13SKU 91815
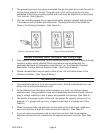
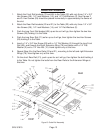
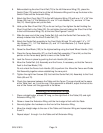
Guide Rail Assembly
1. Attach the Front Rail brackets (72 and 69) to the Table (22) with only three 1/4” x 3/4”
Hex Screws (29), 1/4” Lock Washers (14), and 1/4” Flat Washers (2). See Figures F
and G. Hex Screws (29) should be placed horizontally in approximately the center of
the slot.
2. Attach the Rear Rail brackets (20 and 21) to the Table (22) with only three 1/4” x 3/4”
Hex Screws (29), 1/4” Lock Washers (14), and 1/4” Flat Washers (2).
3. Push the long Front Rail bracket (69) up as far as it will go, then tighten the two Hex
Screws (29) holding it to the Table.
4. Push the long Rear Rail (21) as far up as it will go, then tighten the two Hex Screws
(29) holding it to the Table.
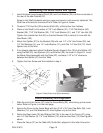
5. Insert a 1/4” x 3/4” Hex Screw (29) with a 1/4” Flat Washer (2) through the long Front
Rail (69), and through the Right Extension Wing (76) and fasten with a 1/4” Flat
Washer (2) and a 1/4” Hex Nut (12). Hand tighten only at this time.
6. Repeat Step 5 for the Rear Rails (20 and 21), mounting to the left and right Extension
Wings (76). Hand tighten only at this time.
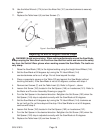
7. On the short Rear Rail (21), push up as far as it will go, then tighten the bolt holding it
to the Table. Do not tighten the bolts from the Rear Rails to the Extension Wings at
this time.
Figure G. Guide Rail Assembly