


Page 17SKU 91815
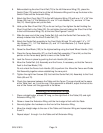
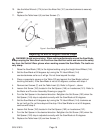
Miter Gauge Adjustment
Always check to see that the Miter Gauge is accurate at 90 degrees before cutting.
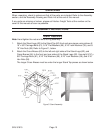
1. To check the alignment, place the Miter Gauge in the Table slot so that the Miter Gauge
body is flush with the Table edge. If it is not flush with the edge, continue with step 2.
See Figure K., below.
2. Loosen the Lock Knob (1).
3. Move the Miter Gauge body until flush with the Table edge. Retighten Lock Knob (1).
4. If the Pointer (5) in not at 90 degrees, loosen the Screw (4) holding the Pointer and
move it to 90 degrees. Retighten Screw (4).
Figure K. Miter Gauge
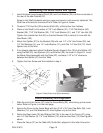
Removing and Installing the Saw Blade
WARNING! Avoid serious injury. When removing or installing a Saw Blade, always
unplug the Table Saw Line Cord from the electrical outlet and remove the safety key
from the Switch! Wear gloves when handling the Saw Blade. The teeth are very sharp.
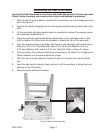
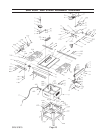
1. Remove two Screws (7) and the Table Insert (8). Refer to Figure L on the next page.
2. Raise the Saw Blade (103) to the highest setting using the Hand Wheel Handle (144).
3. Place a length of wood (not paneling) at least 2” thick in front of the Saw Blade so that
at least one of the teeth engage the wood firmly. This is to keep the Saw Blade from
turning when loosening the Arbor Nut (101).
4. Use the Arbor Wrench (174) to turn the Arbor Nut (101) clockwise to loosen. (The
Arbor Nut has left-hand threads.)
5. Remove the Arbor Nut (101) and Arbor Flange (102).
6. Remove the Saw Blade.
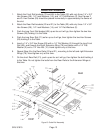
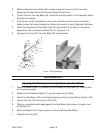
7. Place a new Saw Blade, or professionally sharpened old Saw Blade, on the Arbor
with Flange (113). Note that the teeth should be facing the front of the Table Saw.
8. Replace the Arbor Flange (102) and the Arbor Nut (101).
9. Place a length of wood in back of the Saw Blade so that at least one of the teeth
engage the wood.