


Page 14SKU 91815
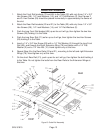
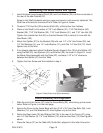
8. Before attaching the short Front Rail (72) to the left Extension Wing (76), place the
Switch Plate (79) behind the lip of the left Extension Wing and line up the holes in the
Switch Plate and the Extension Wing.
9. Attach the Short Front Rail (72) to the left Extension Wing (76) with one 1/4” x 3/4” Hex
Screw (29), two 1/4” Flat Washers (2), one 1/4” Lock Washer (14), and one 1/4” Hex
Nut (12). Hand tighten only at this time.
10. Hold up the Short Front Rail (72) as far as it will go, then tighten the bolt holding the
Short Front Rail to the Table (22). Do not tighten the bolt holding the Short Front Rail
to the Left Extension Wing (76) at this time. See Figures F and G.
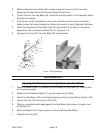
11. Slide the open end of the Long Guide Rail (44) onto the Guide Rail Connector (70),
already inserted into the Short Guide Rail (73).
12. Attach the Guide Rail assembly to the Front Rails (69 and 72) with eight 1/4” x 1/2”
Hex Screws (71), 1/4” Flat Washers (2), and 1/4” Lock Washers (14). Hand tighten
only at this time.
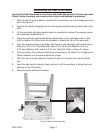
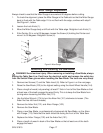
13. Raise the Saw Blade (103) to the highest setting using the Hand Wheel Handle (144).
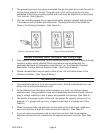
14. Place the Fence Assembly (37) on the Guide Rail assembly (73 and 44) so that the
pointer on the Fence body points to zero on the Guide Rail.
15. Lock the Fence in place by pushing the Lock Handle (55) down.
16. Move the Guide Rail (44) Assembly and the Fence, if necessary, so that the Fence is
flush to the Saw Blade (103).
Do not unlock the Fence Lock Handle (55) to perform this. Move the Fence and Guide
Rail Assembly together when establishing the zero point.
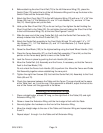
17. Tighten the eight Hex Screws (29) that hold the Guide Rail (44) Assembly to the Front
Rails (69 and 72).
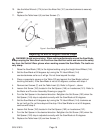
18. Check the clearance between the Table and the Fence. The gap should be the same
at the Table front, as it is at the rear. If the gap width is different, adjust the foot at the
rear of the Fence until the gap width is the same.
Leveling the Extension Wings
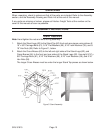
1. Place a straight edge, at least 18” long, on the right-front of the Table (22) and right
Extension Wing (76).
2. Raise or lower the Extension Wing until the front edge is flush with the Table.
3. Securely tighten the hardware on the front of the Extension Wing.
4. Move the straight edge to the rear of the Table and Extension Wing and repeat steps
2 and 3.
5. Repeat steps 1 through 4 on the Table and left Extension Wing.