


Page 18SKU 91815
10. Use the Arbor Wrench (174) to turn the Arbor Nut (101) counterclockwise to securely
tighten.
11. Replace the Table Insert (8) and two Screws (7).
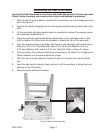
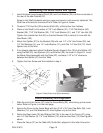
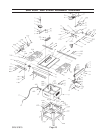
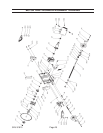
Figure L. Saw Blade Replacement
Adjusting 45 and 90 Degree Positive Stops
WARNING! Avoid serious injury. When making adjustments around the Saw Blade,
always unplug the Table Saw Line Cord from the electrical outlet and remove the safety
key from the Switch! Wear gloves when working around the Saw Blade. The teeth are
very sharp.
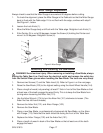
1. Raise the Saw Blade (103) to the highest setting using the Height Hand Wheel (144).
2. Set the Saw Blade at 90 degrees by turning the Tilt Hand Wheel (144)
counterclockwise as far as it will go. Do not force beyond the stop.
3. Place a carpenter’s square on the Table (22) and against the Saw Blade (without
touching the teeth). If the Saw Blade is not at 90 degrees, continue with step 4.
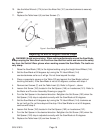
4. Remove two Screws (7) and the Table Insert (8). Refer to Figure L., above.
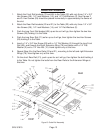
5. Loosen Set Screw (150) located in the Set Spacer (149) on Leadscrew (161). Refer to
the Motor and Trunnion Assembly Drawing on page 24.
6. Turn the Set Spacer in the desired direction. Retighten the Set Screw (150) when the
Set Spacer (149) stop is adjusted correctly with the Saw Blade at 90 degrees.
7. Set the Saw Blade at 45 degrees by turning the Tilt Hand Wheel (144) clockwise as
far as it will go. Do not force beyond the stop. If the Saw Blade is not at 45 degrees,
continue with step 8.
8. Loosen Set Screw (150) located in the Set Spacer (162) on Leadscrew (161).
9. Turn the Set Spacer in the desired direction. Retighten the Set Screw (150) when the
Set Spacer (162) stop is adjusted correctly with the Saw Blade at 45 degrees.
10. Replace the Table Insert (8) and two Screws (7).
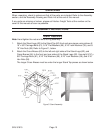
Table Front