


OM-1594 Page 27
SECTION 5 – OPERATION
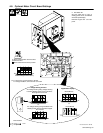
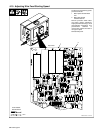
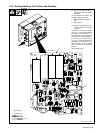
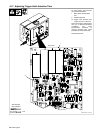
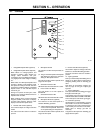
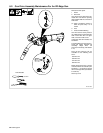
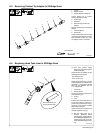
5-1. Controls
801 554
1 Voltage/Wire Speed Meter (Optional)
2 Voltage/Wire Speed Switch (Optional)
When switch is in Voltage position, and
operator is welding, meter displays arc
voltage. Cable resistance and poor
connections may cause displayed voltage to
vary slightly from actual voltage at welding
arc.
When switch is in Wire Speed position and
operator is welding, meter displays preset
wire speed in inches per minute. This wire
speed is the combined settings of the Weld
Speed Control on unit and Wire Speed
Control on gun.
During run-in portion of weld cycle, meter
displays run-in speed as selected on Run-In
Speed control on feeder.
When welding Direct Current Electrode
Negative (DCEN), meter does not display
accurate output voltages; however, meter
displays accurate wire speed values.
3 Remote Volts Control (Optional)
Use control to adjust arc voltage at the wire
feeder.
The scale around the control is marked in
percent.
4 Wire Speed Control
Use control to set wire feed speed after arc
initiation.
. The gun wire feed speed control adjusts
wire speed from minimum to maximum
setting on Wire Speed Control.
The scale around the control is percent of full
range, not wire speed.
5 Schedule A Indicator LED
LED illuminates when Schedule A is active.
6 Press To Set Push Button
Use push button to set wire speed for
Schedule B.
7 Schedule B Indicator LED
LED illuminates when Schedule B is active.
8 Wire Speed B Control (Optional)
Use control to set wire feed speed for a
schedule B welding operation.
. A dual schedule switch must be installed
in unit to set wire speed B. There is no
run-in speed setting for wire speed B.
The scale around the control is percent of full
range, not wire speed.
9 Remote Volts B Control (Optional)
Use control to adjust arc voltage at the wire
feeder for a schedule B welding operation.
The scale around the control is marked in
percent.
10 Jog/Purge Switch
Push up to momentarily feed welding wire at
speed set on Wire Speed control without
energizing welding circuit or shielding gas
valve.
Push down to momentarily energize gas
valve to purge air from gun or adjust gas
regulator.
11 Trigger Hold Switch
Push up to weld without holding gun trigger
throughout the weld cycle.
To start weld, press gun trigger, and trigger
hold will actuate after 3 seconds of weld time.
To end weld, press and release gun trigger.
12 Flowmeter (Optional)
Use flowmeter to control shielding gas flow
at the feeder. The scale on the flowmeter is
in cubic feet per hour (CFH). Read gas flow
at the widest part of the float in the meter.
Rotate valve to change gas flow as
necessary.
A regulator is still required on shielding gas
supply with this option.
1
2
3
4
6
8
10
12
9
11
7
5