


9
To prevent these problems from occurring, ensure the pulley and
sheave are aligned and belt tension is satisfactory after installing new
belts or tensioning existing belts.
ELECTRIC DRAIN MAINTENANCE
NOTE: The following maintenance schedule has been
developed for typical applications.
Maintenance intervals should be shortened in
harsher environments.
DRAIN VALVE MAINTENANCE SCHEDULE
DAILY Test the valve for proper
operation. Clean the filter
screen if needed.
MONTHLY (EVERY 30 DAYS) Clean the filter screen.
To clean the filter screen, perform the following steps:
1. Close the strainer ball valve completely to isolate it from the air
receiver tank.
2. Press the TEST button on the timer to vent the pressure remaining
in the valve. Repeat until all pressure is removed.
aCAUTION! High pressure air can cause injury from flying
debris. Ensure the strainer ball valve is
completely closed and pressure is released
from the valve prior to cleaning.
3. Remove the plug from the strainer with a suitable wrench. If you
hear air escaping from the cleaning port, STOP IMMEDIATELY and
repeat steps 1 and 2.
4. Remove the stainless steel filter screen and clean it. Remove any
debris that may be in the strainer body before replacing the filter
screen.
5. Replace plug and tighten with wrench.
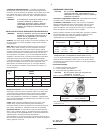
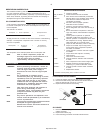
Strainer Ball Valve
6. When putting the EDV-2000 back into service, press the TEST
button to confirm proper function.
TANK INSPECTION
The life of an air receiver tank is dependent upon several factors
including, but not limited to, operating conditions, ambient
environments, and the level of maintenance. The exact effect of these
factors on tank life is difficult to predict; therefore, Ingersoll-Rand
recommends that you schedule a certified tank inspection within the
first five years of compressor service. To arrange a tank inspection,
contact Ingersoll-Rand.
If the tank has not been inspected within the first 10 years of
compressor service, the receiver must be taken out of service
until it has passed inspection. Tanks that fail to meet requirements
must be replaced.
aWARNING Failure to replace a rusted air receiver tank
could result in air receiver tank rupture or
explosion, which could cause substantial
property damage, severe personal injury, or
death. Never modify or repair tank. Obtain
replacement from service center.
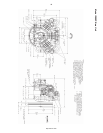
BELT ADJUSTMENT
CHECKING BELT TENSION. Check belt tension should be occasionally,
especially if looseness is suspected. New belts must also be properly
tensioned upon installation.
TENSIONING BELTS. Belt tensioning can be achieved by loosening the
motor anchor screws, pushing the motor away from the pump, and
retightening the motor anchor screws. Some units are equipped with a
belt tensioning bolt that, when turned, pulls the motor away from the
pump. Otherwise, the motor can be easily moved by placing a prying
tool beneath it. A commercially available spreader or other belt
tensioning device can also be helpful.
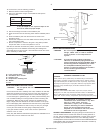
Follow the procedures outlined below to correctly set and measure
tension.
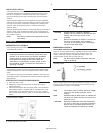
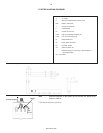
1. Measure the span length (t) of the drive.
2. Determine the amount of deflection (in inches) required to measure
deflection force (in pounds) by multiplying the span length (t) by 1/
64. For example, a 32” span length multiplied by 1/64 equals 1/2” of
deflection required to measure deflection force.
3. Lay a straight edge across the top outer surface of the belt drive
from pulley to sheave.
4. At the center of the span, perpendicular to the belt, apply pressure
to the outer surface of the belt with a tension gauge. Force the belt
to the predetermined deflection calculated in step 2. Compare the
reading on the tension gauge to the BELT TENSION TABLE in the
DIAGRAMS & TABLES section.
Ensure the pulley and sheave are properly aligned and the motor
anchor screws are adequately retightened prior to restarting the
compressor.
aCAUTION Improper pulley/sheave alignment and belt
tension can result in motor overload,
excessive vibration, and premature belt and/or
bearing failure.
http://air.irco.com