


23
4. After the machine has run for about 30
minutes, stop to check that the set screws
and bearing bolts are still tight.
NOTE: It may be necessary to re-align the
tension rollers after rotating the drum bearings.
See page 18.
Replacing Drum Bearings
If the bearings are squealing or are loose, they
may need replacing.
1. Unplug sander from power source and
remove dust cover.
2. Raise conveyor table until the sanding drum
rests on the conveyor.
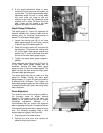
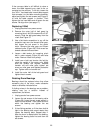
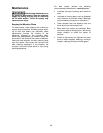
3. Outboard: Remove the two knobs and
washers that are holding the bearing in
place. Loosen the two set screws in the
bearing collar and slide the bearing off the
end of the drum (Figure 41).
4. Install a new bearing on the shaft of the
drum and tighten the bolts. Tighten the set
screws in the bearing collar. Make sure the
bolts go through the drum shield and
tension roller support brackets (see
exploded view, page 36).
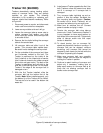
5. Inboard: Remove outer half of belt guard by
removing the six #10-32 screws in the
guard. Slide the belt guard away from the v-
belt.
6. Release v-belt tension by loosening pinch
bolt in motor support and raising motor.
7. Loosen the set screw in the driven pulley
and remove the pulley from the shaft.
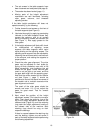
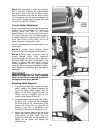
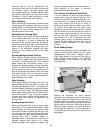
8. Remove the bolts holding the inboard (right)
bearing in place. See Figure 40. Slide the
inner half of the upper belt guard off the end
of the shaft along with the bearing.
9. Install the new bearing on the shaft and
install the inner half of the upper belt guard
in the same manner as it was removed.
Make sure the bolts go through the tension
roller brackets and drum shield. Install the
new inboard bearing.
10. Center the drum between the carriage legs
before tightening bolts. Tighten the bolts in
the bearing and the set screws in the
bearing collar.
11. Install the driven pulley (shown in Figure 40)
making sure it aligns with the drive pulley on
the motor. Tighten the set screw.
12. Install the outer half of the belt guard cover
and tighten the six #10-32 screws.
Figure 40
Figure 41
13. Align the drum and tension v-belt according
to instructions in this manual.
14. Check all bolts and set screws for tightness,
and check them again after sanding for 30
minutes.