


9
Assembly
Tools required for assembly:
Hoist, forklift, or one or more assistants
Wrenches – 9/32”, 1/2” , 9/16”
Hex wrenches – 4mm, 1/8”
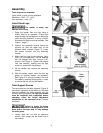
Install Stand Legs
The sander is heavy; use
caution when lifting.
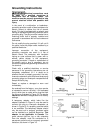
1. Raise the sander from the floor using a
forklift, hoist or an assistant. (Place hoist
straps through the carriage arm or below the
table mounting brackets. If using a forklift,
fork below the table mounting brackets. See
Figure 1, page 7.)
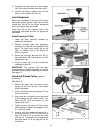
2. Position the assembly fixtures below the
columns so that the wider part of the
plywood faces outward (Figure 3). Lower
the sander columns into the assembly
fixtures.
3. Mount the four legs to the columns, using
3/8x1-1/2 hex head bolts, 3/8 flat washers
and 3/8 flanged lock nuts, using a 9/16”
wrench. See Figure 3. Tighten the flanged
lock nuts securely, making sure the legs
remain in contact with the plywood.
4. Lift the sander and remove the assembly
fixtures.
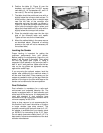
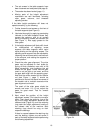
5. With the sander raised, install the four leg
glides, (or optional casters, not provided).
See Figure 4. If using the casters, first lock
the caster by pressing the large tab, in order
to remove the hex nut and flat washer.
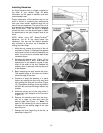
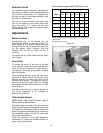
Table Support Screws
The set screws on the table supports (Figure 5)
have been tightened at the factory to eliminate
free-play between the table supports and the
columns during shipment. All four set screws
must be loosened and re-adjusted before
operating either the height adjustment
mechanism or the conveyor drive. Proceed
as follows:
Failure to follow the below
procedure may result in misalignment of the
drum and/or conveyor bed, or may damage
the miter gears.
1. Loosen each hex nut with an open-end
wrench, then loosen the set screw with a
hex wrench.
Figure 3
Figure 4
Figure 5