


6
LEARNING TO STICK WELD
6
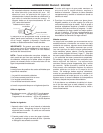
Multiple Pass Welds
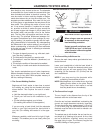
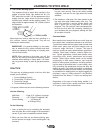
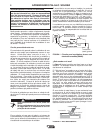
Make multiple pass horizontal fillet joints as shown in
the sketch. Put the first bead in the corner with fairly
high current. Hold the electrode angle needed to
deposit the filler beads as shown putting the final bead
against the vertical plate.
Welding in the Vertical Position
Welding in the vertical position can be done either ver-
tical-up or vertical-down. Vertical-up is used whenever
a large, strong weld is desired. Vertical-down is used
primarily on sheet metal for fast, low penetrating
welds.
Vertical-Up Welding
The problem, when welding vertical-up, is to put the
molten metal where it is wanted and make it stay
there. If too much molten metal is deposited, gravity
will pull it downwards and make it “drip.’’ Therefore a
certain technique has to be followed:
1. Use 1/8" (3.2mm) at 90-105 amps or 3/32" (2.4mm)
at 60 amps Fleetweld® 180 electrode.
2. When welding, the electrode should be kept hori-
zontal or pointing slightly upwards. (See drawing.)
3. The arc is struck and metal deposited at the bottom
of the two pieces to be welded together.
4. Before too much molten metal is deposited, the arc
is SLOWLY moved 1/2”-3/4" (12.5-19mm) upwards.
This takes the heat away from the molten puddle,
which solidifies. (If the arc is not taken away soon
enough, too much metal will be deposited, and it
will “drip.’’)
5. The upward motion of the arc is caused by a very
slight wrist motion. Most definitely, the arm must not
move in and out, as this makes the entire process
very complicated and difficult to learn.
6. If the upward motion of the arc is done correctly
with a wrist motion, the arc will automatically
become a long arc that deposits little or no metal.
(See drawing.)
7. During this entire process the ONLY thing to watch
is the molten metal. As soon as it has solidified, the
arc is SLOWLY brought back, and another few
drops of metal are deposited. DO NOT FOLLOW
THE UP AND DOWN MOVEMENT OF THE ARC
WITH THE EYES. KEEP THEM ON THE MOLTEN
METAL.
8. When the arc is brought back to the now solidified
puddle, IT MUST BE SHORT, otherwise no metal
will be deposited, the puddle will melt again, and it
will “drip.”
9. It is important to realize that the entire process con-
sists of SLOW, DELIBERATE movements. There
are no fast motions.
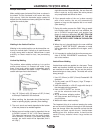
Vertical-Down Welding
Vertical-down welds are applied at a fast pace. These
welds are therefore shallow and narrow, and as such
are excellent for sheet metal. Do not use the vertical-
down technique on heavy metal. The welds will not be
strong enough.
1. Use 1/8” (3.2mm) or 3/32" (2.4mm) Fleetweld® 180
electrode.
2. On thin metal, use 60-75 amps. (14 ga 75 amps —
16 ga 60 amps.)
3. Hold the electrode in a 30-45° angle with the tip of
the electrode pointing upwards.
4. Hold a VERY SHORT arc, but do
not let the electrode touch the
metal.
5. An up and down whipping motion
will help prevent burn-through on
very thin plate.
6. Watch the molten metal carefully.
The important thing is to continue lowering the entire
arm as the weld is made so the angle of the electrode
does not change. Move the electrode so fast that the
slag does not catch up with the arc. Vertical-down
welding gives thin, shallow welds. It should not be
used on heavy material where large welds are
required.